Showing posts with label cookies. Show all posts

Tuesday, April 10, 2018

Homemade Iced Gem Cookies


Gem Cookies......sounds familiar to you? or should I used back it's original name as "belly button cookies"? 😆😆 Those were the sweet memories I have when I saw this in one of the social media, and I thought to myself, I must make this. I have always loved this cookies since I was a kid, and even until now. ........but of course now, I can't take them as I ditched carbs and sugar.,,,,,,,how sad to have to forego these childhood memories treats.....but it's OK, as in the house, there'e my kids and my nieces, and also most of my friends still loves them, that gives me a chance to have the excuse to bake them, LOL

Like I said, I have always wanted to make these Gem Cookies as I would like to have a more buttery cookie base, and the icing on top, I would prefer it to be like a meringue base, crunchy on the outside, and when bite into it, it's a little soft and mellow like there is a hint of marshmallow in it. The original belly button cookie the top was iced with royal icing if I'm not mistaken.....anyway, it still tastes great until today. But today, I'm going to make my version of it, which Cupcake Jemma did just that.....little Gem Cookie iced with Meringue 😋😋

Here is how you do your homemade version of these Belly Button Cookies or the new and more glamorous name now is Gem Cookies , hahaha

https://plus.google.com/u/0/photos/photo/114625954057922568813/6542688428240990482
You may download the above recipe card by clicking unto this link:


Happy baking and hope you like this upgraded version of this cookie ! Tell me how do you like by commenting down below, have a nice day!


Tuesday, March 13, 2018

RAINBOW MERINGUE KISSES......AND I'M BACK


It's been awhile since I last updated my blog......reasons are a lot, and I don't that matters anymore, as I have decided to keep this blog active all over again. Thanks to those who are still actively following me, and because of you, I made a decision to come back and start blogging again. I hope that I'll be able to constantly update and post as often as I can......at least 1 posting a week? 😉

This first comeback posting is a request from my daughter, she has been asking me to bake her meringues since last week, and because I'm tight up with some cake and cookies orders, I wasn't able to until this week where I'm a bit too free, haha.........ya, I meant really very free, until I'm able to finished off a 20 episodes K-series , A Korean Odyssey starring Lee Seung Gi in 3 days 😜

To spice up the meringues a little, I added some food coloring to make it more sweet looking and not so plain as the usual ones. As I'm sure all of you knows that you can easily whipped up a batch of meringues in just less than 10 minutes and what took the longest, was the baking part. As for the ingredients, you only need 2 things - fresh egg whites and castor sugar.

Here is the recipe for those of you who wish to give it a try.


You may download the recipe card above by clicking unto this link:-
https://drive.google.com/file/d/12-hq1flVgdjbiftVfPzooGIE-Tvd7Jxu/view?usp=sharing


Happy baking !

Friday, November 4, 2016

White Chips Dark Chocolate Cookies

When it comes to cookies, I never have to worry if there will be anyone in the house to eat it or not, as I can tell you, I have a few Cookie Monsters in the house, yeah, and they rock!! Hahaha.....kidding!


But, well, it's true that they are Cookie Monster alright, as every cookie jars filled will be emptied in a week. So, I never have to worry baking cookies as they will always be supporters to ate them all up, before I start baking the next recipe on my cookie baking list.

Last week I went into a baking shop and saw this 'Black Chocolate Powder' and instantly I scooped it up and head to the counter. I have been looking for this Black Chocolate Powder for quite some time now after having a cookie recipe that calls for it. Normally, they only have like Chocolate Powder (the brown ones) or Cocoa Powder, even the Hershey's brand here in KK are basically the 'Natural Unsweetened Cocoa Powder' ones that you can find and no others. Oh, and to make my cookie more contrasting with its companion, I chosed the Milk White Chocolate chips instead. As you can form my pic above, it's really 'B&W' combination there, haha

This recipe yields me a 2 full big cookie jars and the kiddos at home were so delighted to see it all filled up again, yea....I'm the Best Mom in the world eh, ok I know, tsk tsk


 White Chips Dark Chocolate Cookies 

Ingredients
2-1/4 cups (282gm) all purpose flour
2/3 cup (78gm) Black Chocolate Powder
1 tsp baking soda
1/4 tsp salt
1 cup butter (227gm) , room temperature
3/4 cup (150gm) castor sugar
2/3 cup (133gm) packed brown sugar
1 tsp vanilla extract
2 large eggs
2 cups White Chocolate Chips

Method 
  1. Preheat oven to 350F / 175C.
  2. Combine flour, dark chocolate powder, baking soda and salt in a bowl.
  3. Beat butter and the 2 types of sugar (castor and brown) in a mixing bowl using a mixer until creamy. 
  4. Add eggs one at a time, beating well after each addition. Gradually add the flour mixture in 2 to 3 batch. Add in the White chocolate chips and using a spatula to mix it well and evenly with the dough.
  5. Using a teaspoon, scoop a dollop and drop it on a baking tray lined with parchment paper, leaving about 1 inch apart.
  6. Bake for 10 to 12 minutes or until centers are set. Do rotate the baking tray half way through your baking to evenly bake the cookies.
  7. Cool on the baking tray for about 2 to 3 minutes before removing it to the wire rack to cool completely. Once completely cool, you may store them in your cookie jars, airtight and it can store up to 2 weeks.
Note : These cookies are so yummy because it's the bittersweet from the black chocolate powder blends in so well with the milk choc chips.

Till then, Happy baking and have a good weekend!


Tuesday, April 24, 2012

Lavender Cookies....something unusual but nice

I actually forget to tell you guys that when I went to the 'chinese medical herb shop' the other day to buy my Osmanthus Flower, I didn't only just settle for that......but I ended up buying Rose Flower and also Lavender Flower. According to the shopkeeper, he advised that Rose Flower helps in promoting beautiful skin, whereas Lavender Flower helps in Insomnia, it promotes better sleep and also relaxes the muscles and the mind after a tiring day. 
In fact this is the first time I actually bought dried flowers .........as I don't normally make flower teas, but more to Green Tea and of course, Coffee!!! LOL 


As far as I can remember, I have never bake with any dried flowers before too......so, it's time to start now, eh....hehehe. After the Osmanthus flower attempt in making the Konnyaku, I have also started searching in the internet for other relevant recipes in baking and cooking using these flowers.
Don't be surprise you start seeing me posting topics on baking or cooking with Rose, Osmanthus, Lavender or maybe Chrysanthemum and Jasmine, LOL.....:P
Anyway, these batch of Lavender Cookies were baked by the suggestion from my BFF, Marilynda. She told me that she loved these Lavender Cookies after her first time tasting it years ago, when her neighbor gave a box to her after her return from England for a holiday. The brand of the cookies that she tasted was from 'Marks & Spenser'.......oh, I see.....now that makes me even more lighted up with the urge to quickly work up a cookie dough and bake it, hehehe :P

I promised her that I will come up with the recipe after a search from the WWW and by Monday, I'll be seeing her for lunch with a box of Lavender Cookies for her taste testing :)
And so I search and manage to find a few........but I only need one that is the BEST!!....and after thoroughly going through the ingredients, I finally decided with my own, where I altered here and there........trust me, its' the easiest and the promise of a good cookie crunch is sealed!


Give it a try, it's not asking for a thousand things........just plain simple ingredients that I'm sure you can easily them on your kitchen cupboard......of course, except for the "Lavender Flowers".

LAVENDER COOKIES (Makes about 3 dozen)
Ingredients
315gm all purpose flour (I used HK Flour)
250gm butter , softened
190gm Icing sugar
1 large egg, lightly beaten
2 tsp baking powder
1 1/2 Tbsp of dried Lavender flowers, I used it whole, you might like to chop it if you wish :)

Method
  1. Preheat the oven to 170 degree Celsius and line 3 cookie trays with parchment papers.
  2. In a large bowl, beat butter  with icing sugar until light pale and fluffy, about 4-5 minutes.
  3. Add in the egg, and mix thoroughly until well combined.
  4. Sift together the baking powder and flour, and slowly add in to the mixture on low speed until combined.
  5. Add in the lavender flowers and stir thoroughly.
  6. You can use a spoon to scoop the dough and place a dollop on the cookie tray, OR like me, I use my cookie piping gadget (that I bought 2 years ago, but haven't try it out yet, so this is the chance, hehe). I scooped enough of the dough and insert it into the tube, locked the top. Then, I placed a disc of the pattern I chosed, and locked the bottom, and start piping it on the parchment paper :)
  7. Bake the cookies at 170 degree Celsius for  18 minutes (on my oven).....you kindly adjust the time according to your oven ya.

Transfer the cookies to the tray, let it cool for about 5-10 minutes and transfer it to the wire rack to cool completely before storing it into an airtight container. 

 Here are some beautiful pictures that caught my attention . Just look at those beautiful Lavender field.....like a carpet.....hmmm...aaaahh!!

How I wish I was the owner of this house.....sigh!!
Can you imagine yourself walking on these lovely Lavender field with you loved ones.....aaw!!
Lastly, imagine yourself sipping a cup of English Tea with a small plate of Lavender cookies.....baked by me, LOL
Cheers, hehe!!


Friday, July 15, 2011

ANGRY BIRDS project


As some of you would know that I have a side-small home-business taking orders for cupcakes, cakes and cookies as part of my passion for baking........it's called "Cupcakes Fairytale". I have started this little small scale home biz since last year September, and with the support from friends and family, it's been doing pretty well........and with their constant support and encouragement, I haven't stop baking ever since *wink* . I will continue to bake and create what I was commissioned to by my customers, and will constantly improve my skill through the days.

Presently, the 'talk of the town' is this game called "ANGRY BIRDS" and I wouldn't believe you if you tell me you have not heard of them, LOL. My Hubby downloaded the game to his Tab and ever since, Angel was obsessed with the game and also the 'Red bird'........don't ask me why the red one......LOL

With the town now talking about these 'birds', I made an attempt to make a batch of them in Sugar Cookies with fondant of the birds design. Cupcakes Fairytale has created "Sugar Fondant Cookies" as one of their popular party favors amongst kid's parties.......and I'm sure this creation theme would also make a hit.

There you go, I have created the whole gang of "Angry Birds" and also not forgetting the 'Pig'.....LOL


Are you game for Angry Birds??


Wednesday, January 26, 2011

Nestum Cereal Crispy Cookies


This is another cookie recipe that I totally have no record or memory where I got it from, as it was hand-written by me it a miserable piece of old 'chinese tear-off type of calendar' (if you know what I meant, hehe)......but I'll definitely make it again, and it is a sure keeper as the texture of these cookies are awesome. You can almost smell the buttery smell in the whole kitchen when the cookie is almost done baking, and best of all, it's crunchy from the inside out unlike most of the cookies that I made previously, all of which are always crunchy on the outside only, when it comes to the centre of the cookies.......it's a little 'soggy' or 'cakey' .......making me wonder if I have underbake it or what?

So, as promise to some 'Baking Friends', here is the recipe and I have added some of my own notes (in green) to it, hope it helps enhance the outcome of the cookies J

Here's the ingredients:

400 gm plain flour / superfine flour ( I used HK Plain Flour)

300gm Butter, at room temperature

150gm Nestum Cereal (I spread it on a baking tray and roast it at 160 degree Celsius for about 15-20 mins to get a more fragrant and crunchier cereal)

4 egg yolks

200gm Icing sugar (I already adjusted , so it's not sweet)


Method:

  1. Mix egg yolks, butter and icing sugar with hand until icing sugar is melted. (However, I used the mixer, hate to get messy hands, hehe)
  2. Add in Nestum cereal and plain flour and knead to form a dough.
  3. Greased and lined the baking tray with parchment paper. Preheat oven to 160 degree Celsius.
  4. Take a small amount of the dough and knead into a ball, put it on the tray and flatten it using the back of a fork, or if you prefer it to be just smooth round, and do the same with the rest of the dough.
  5. Glaze the top of the cookies with egg yolk and bake at pre-heated oven of 160 degree Celsius for 30 minutes or until golden brown.
  6. Leave to cool on the wire rack before storing into air-container.


 Happy Cookies Baking!!
Counting down to Chinese New Year....another 1 week to go!!

Sunday, January 23, 2011

Frangrant Peanut Cookies....another ‘must –have’ for Chinese New Year


I love everything that has 'nuts' in it and all kinds of nuts .....to name a few, Almond, Hazelnut, Pistachios, Macadamias, Walnut and of course....Peanuts! Last year, I did not manage to make Peanut Cookies for the Chinese New Year, as this cookies is delicious to eat, but when it comes to the preparation work.....it's a lot!! You have to at least allow yourself a day to start with 'oil-less frying' of peanuts in the wok till it cook, with very low –medium heat, and that already have you tested on your patience, hehe.

Then comes the part where you have to remove the skin of the peanuts, using the palms of your hands, and then flip it up and down on a tray with the fan blowing on low speed to blow off the skin, well, if you have a better and easier way, please do suggest. I did not do mine this time because my hubby is such a good helper this year (maybe age is catching up on him, and he finally decides that he 'should' at least participate in the Chinese New Year baking and frying and cleaning of the house), which actually surprises me a lot.....a tonnes in fact!!! LOL.....the past few years, he would just watch me do, and then walk off before I can start to open my mouth and order him to do something. Anyway, hubby helped me to blew of the skin of the peanuts and I only did the grinding ....using a grinder or miller that is ;) Thanks dear....muaks!!

After the grinding of the peanuts to 'an almost fine peanut powder' ( I grinded mine to really fine texture because I prefer the cookies to be peanut - chunkless), then you are ready to make and bake your Peanut Cookies.


To start off, get all the following ingredients ready as per follows or you can always check this original source at here :-

500gm plain flour

500gm roasted peanuts (skinless and finely milled)

500gm castor sugar (this amount is already adjusted, but if you prefer to cut down, please do so)

200ml + 2Tbsp peanut cooking oil (to better enhance the fragrance of the cookies)

1 egg for glazing

Some peanut halves for deco, if you want, (I grinded all, so none left for deco L) haha....


Methods in 4 easy steps......


  1. Mix plain flour, castor sugar and milled peanuts well until all blended in, then add in the peanut cooking oil and knead with your hands until the oil and the mixture are well incorporated and form a dough. Leave it for about 20 minutes.
  2. Take a small amount of the dough and roll into a small ball and place it on the a lined baking tray with baking paper. If you are using the peanut halves for deco, then you can place a small piece on top and lightly press on it. Do the same to all the rest of the dough.
  3. Use a pastry brush and glaze the top of the cookies with the 'lightly beaten' egg .
  4. Bake at pre-heated oven at 170 degree Celsius for about 15 - 20 minutes or until lightly golden brown. Let it cool completely on the baking tray before storing into airtight containers.
Happy 'Peanut Cookies' baking!!

Saturday, June 19, 2010

Learn2Bake June Part 2 Challenge – Danish Butter Cookies


OK, it's the month of the FIFA Worldcup and to tell you the truth, I'm on watching all the matches I can get myself up and awake at :P Therefore, you can see that I'm lagging behind on my postings lately, hehe……I'll try to catch up as much as possible as I wouldn't want to be left with post that is too overdue and expired. The Learn2Bake club is still carrying on with the challenges and I'm not going to let the Worldcup drag slow me down, so I decided that since this weekend is 'Happy Father's Day' , I'll make it a point to bake something and also to complete my challenge that has been lining up in my "TO DO" list. So I baked my Learn2Bake June Part 2 Challenge – Danish Butter Cookies today.I did not use the recipe chosen for the challenge, as I wanted to try other 'Danish Butter Cookies' recipes that I have collected. This is an advantage for myself and the members as we get to test 2 recipes at the same time. The reason also being that I heard a few members who has already completed their challenge commented that the recipe given was a bit 'sweet' and the 'buttery' taste of the cookie is not that obvious…….hmm, I wonder this one that I'm going to use will be a bit different, as I realized that the one the members are using has 'a teaspoon of lemon juice' in it…….and mine doesn't :P
I did made a note to cut down on the sugar as I find that it's a bit ridiculous to call for 1 ½ cup of sugar (337gm)…….that was really a lot!!! I initially wanted to shaped the dough into a flower shape using the cookie piping tube, but the dough was way too soft and the shape just doesn't come out as one, it was all in a lump and to tell you the truth, it was really messy….especially when I had to clean and wash it…..gosh! So lastly, I decided to do a 'drop' cookie using 2 teaspoons……..and well, it sure safe me a lot of time and mess too. The decorating was pretty simple as I want it to be as simple as just a 'Butter Cookies' , so I used only cut glace cherries and toasted almond flakes.
Final verdict, I would say the texture was really crispy and crunchy, though I still find it a little sweet (even after cutting down the sugar to 190gm, maybe I should use only 150gm next time), but the cookie was a really buttery Danish Butter Cookie……the kids loved them. This recipe yield about 2.5 dozen (2 full cookie jars) and it was gone in 2 days…….hehe
So, this is another Danish Butter Cookie recipe that you might want to keep besides the one that was being selected for the challenge……..for me, one challenge down and one more to go (Daring Bakers)…….phew!!


DANISH BUTTER COOKIES
(Recipe from CDKitchen.com, yields 2.5 dozen)
 Ingredients:
1¼ cup / 285gm unsalted butter, softened
1½ cup / 337gm granulated sugar (Please cut down to at least 150-160gm, as I find that 190gm is still sweet)
3 egg yolks, beaten
2¼ cup / 280gm all-purpose flour, sifted
1 tsp baking soda
1 tsp cream of tartar
1½ tsp vanilla essence / almond essence

 Method:
  1. Cream butter and sugar until pale in colour and fluffy.
  2. Beat egg yolks in, one at a time. Add remaining ingredients and mix well. Chill dough for about 30 – 40 minutes. (I did not chill as I was in a rush, hehe :P)
  3. Use a teaspoon to scoop a dollop of the dough, and light put on the cookies sheet lined with parchment paper. You can the back of another teaspoon to push the dough down and shape it to a round ball, then lightly flatten with the back of the spoon. Glaced with cut cherries or toasted almond flakes, or you can just leave it plain.
  4. Bake at preheated oven at 170 degree Celcius for 12 – 15 minutes or until the cookies is lightly brown in gold colour. Take note that the cookie will be soft to the touch when it's still hot, but will hardened when it's cool.

  1. Remove the cookie from the oven and cool on the rack for about 10 minutes, then transfer it to the rack to cool completely before storing them in an airtight container.  


Happy Butter Cookies Baking !!

Saturday, June 5, 2010

Dried Apricot Shortbread Hearts


Today is another Public Holiday and it's one of those Agung's birthday as far as I know……but please don't test me or ask me his name or age…..I really have no idea. I think I'm not the only Malaysian who doesn't bother about that as long as there is a PH for us to stay back at home and spent some quality time with the family….:PAnyway, today I was the only one at home with the kids as Hubby still has to open for business in the morning and night……and moreover the twins (Daniel & Dylan) are participating in the KK Chess Association Chess Competition that will be held over 2 days. I sent them to the Asia City Shopping Centre and get them registered, then left for home until later at 2pm then head back there to fetch them. Well, not that I don't want to be there to see them compete………but they chased me off so that they don't feel nervous wo……L ok lah…..let them compete peacefully without having to worry their 'mum' will be there peeping through some crowd to see them, LOL.
So , as I reached home around 10.30am, still so early, and the other two (Ian & Angelica) were still in slumberland……I decided to bake something easy and fast just to kill time before I start catching up on my outdated blogs. I chosed to baked this "Dried Apricot Shortbread' because I have actually wanted to bake this for Christmas last year, but couldn't find dried apricots…….and now that I have a packet of it in the fridge, why not?
This recipe was taken down by me from here and the outcome was very rich, buttery shortbread with the apricot blending in so nicely…..it's just perfect! I love it and gave some to my SiL and will definitely make this again…..especially for Christmas as a gift! Keep that in mind…… ^-^

 
Dried Apricot Shortbread Hearts
Ingredients
223gm unsalted butter, room temperature
¾ cup Confectioners / Icing sugar
1 tsp vanilla essence
2 cups multi-purpose flour
½ tsp salt
½ cup finely chopped dried apricots (or any other dried fruits of your choice)

 
Methods
  1. Pre heat oven to 325~F / 180~C and place the rack in the centre of the oven.
  2. Put butter, sugar, vanilla essence, flour and salt in a large mixing bowl. Stir to combine all the ingredients together, but not creamy.
  3. Add in the dried apricot. Pour the mixture into an 8-inch square baking pan. Press the dough evenly and firmly on the baking pan.
  4. Bake at preheated oven for about 30 minutes or slightly golden in colour. You might want to cover the top with aluminium foil after baking for 20 minutes to prevent overly browned.
  5. Let cool on a wire rack for about 20 minutes. Run a knife along the edges of the baking pan and transfer the shortbread to a flat work surface.
  6. Cut out heart with a 2 or 3 inch 'heart shaped cookie cutter'. Trim off the stray bits of the apricot with a sharp knife.
  7. The shortbreads can be stored in an airtight container for up to 5 days.


Happy Shortbread Baking !

Saturday, April 24, 2010

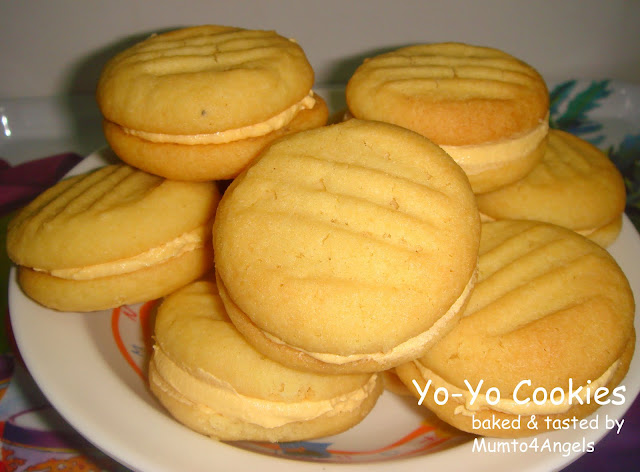
YO-YO Cookies with Buttercream Filling


Ian is going to a friend's house to do some school project and he politely asked me if I can bake something for him to bring over to his friend's house…..like cookies J. Of course, I'd be delighted to if you think Mummy's food is good enough to be presented in front of your friends, I said………^_^ and he assured me that he is very proud of my creation……LOL……thanks dear. So I baked him some 'Yo-Yo Cookies' which I think would be perfect for the kids as its soft and sweet and has a filling sandwiched in it……..where I personally think kids just loved sandwich cookies. I can still remember my 4 kids……..whenever they eat OREOs …..they would open up the cookie and licked off the vanilla cream first before they eat the cookie…….haha…….so I bet this would be a good choice ;)It's really easy to make and with this recipe, I managed to get 16 pairs of Yo-Yos……..the only thing is I find the cookies a bit sweet when the buttercream filling was in it, so maybe the next time I make, I'll cut down on the sugar from the cookie recipe from 60gm to 40gm instead (you might want to take note of this too). By the way, you can even sandwich with whatever filling you like……example: strawberry jam, peanut butter, chocolate ganache and etc…….
Here's the recipe and hey, do get your kids to involve in the sandwiching…..they'll have fun and mine were mostly done by Angelica…….LOL
Happy Yo-Yo Cookies baking J


YO-YO Cookies with Buttercream Filling

Ingredients
125g unsalted butter, softened
100g ghee
60g icing sugar (can be reduced)
120g plain flour
120g self-raising flour
60g custard powder


Icing Filling
80g unsalted butter, softened
110g icing sugar
½ tsp vanilla extract

Preparation
1. Preheat oven to 180°C. Lined two baking sheets with parchment paper, and set aside.
2. Sift together plain flour, self-raising flour and custard powder, set aside.
3. Cream butter, ghee and icing sugar until light and fluffy. Mix in flour mixture to form a soft dough.
4. Divide dough into about 25g each, about 24 - 25 portions. Roll each into a ball and place on a baking tray. Use the prongs of a fork to flatten the balls.
5. Bake for about 15- 20 minutes. They will still appear soft to the touch. As the freshly baked biscuits are quite fragile, cool for 5 – 7 minutes on the tray when they have hardened a bit, before removing to a cooling rack.
6. Once cold, pipe a little filling onto the flat side of half the biscuits, and sandwich it together with another biscuit to make a Yo-Yo.


Icing Filling:Cream together butter, icing sugar and vanilla until soft and fluffy. Fill into a piping bag fixed with a star nozzle (I just used a palette knife to spread the buttercream, hehe, lazy lah to use a piping bag)


Happy Yo-Yo Cookies Baking !


Tuesday, April 20, 2010

Cute Animal Cookies


OK, so this weekend I didn't get to bake anything big because I was working, but it just doesn't feel right to see the kitchen being so quiet and the oven being unheated....hahaha, I know I sounded crazy, but that's just me :p I just have to bake something today because if not, I won't be in peace the whole day. The other day, I bought a set of 'Animal Cookie cutters' and they are just so cute........heh, now I have an excuse to bake.......LOL, and Angelica totally demanded that I do too, because she saw those lovely cutters and just couldn't wait to eat a cookie made out of it ^_^

I picked a very simple cookie recipe from one of the my newly invested cookbook, hehe – "50 All Time Favourite Bakes by Seashore Publishing (M) S/B" at a very special promo price of RM9.90 at Popular Bookstore (usual price RM21.90) and it's called the "Animal Cookies'. The cookies turned out really cute with the 'animal prints' on it, and it sure makes the kids 'ooh-ing' and 'wah-ing' all the way when it came out of the oven.......LOL

And this is the recipe, it's very simple and it can be prepared and done within less than 40 minutes. get your kids to involve and have fun ..........as usual, Happy Cookies Baking from me to you ^-^


Animal Cookies

Ingredients 
(A) 
150gm Unsalted Butter
50gm Icing Sugar
50gm Brown Sugar
1 tsp Vanilla essence
2 Egg Yolks
1 Egg white
Pinch of salt
Pinch of Ground Cinnamon (optional)

(B)
325gm All-purpose Flour / Plain Flour
50gm Milk Powder
30gm cornflour
½ tsp Baking powder 

Method
  1. Pre-heat oven at 180~C and line 2 baking tray with parchment paper or lightly greased it.
  2. Beat (A) till light and fluffy.
  3. Sift (B) and fold in lightly into (A) until a dough is form.
  4. Roll the dough into 3mm thickness and use the animal cookie cutter to shape it. Place onto a greased tray or on parchment paper, bake for 20 minutes at 180~C.
  5. Set on the wire rack to cool before storing into air-tight container.


  Happy Animal Cookies Baking !!


Friday, February 12, 2010

CHINESE NEW YEARS COOKIES

Yes, Chinese New Year is a festive celebration that everyone (I meant the Chinese) would like to take this opportunity to bake and make some yummy snacks, cookies and traditional good food. As this is the first year that I bake something for Chinese New Year, it looks like I wanted to make almost everything in the cookbook, but too bad, time does not permit. Anyway, I still managed to bake some cookies, fried some snacks and made some cupcakes. These are what I bake for Chinese New Year, hope you like it and I know it's a bit late when this post came up, but well, these cookies are good for any occasion, not necessarily for Chinese New Year. So, as usual..... Happy Cookies baking!

Cookies # 1 - LEMON CHEESY SNOWBALLS
(Recipe adopted from Y3K New Year Cookies Cookbook by Alan Ooi)


Ingredient
(A) 130gm butter ( I used 'Butteroll' instead)
      80gm cream cheese
      50gm icing sugar
      1 Tbsp lemon essence (I used 1 Tbsp of fresh lemon juice)
(B) 150gm Plain Flour (I used Superfine flour)
      30gm potato flour
*Some Icing sugar / Snow powder for dusting

Method
1.  Preheat oven at 120~C to 140~C (every oven has a different heat setting).
2.  Beat ingredients (A) until light and pale form.
3.  Sieve in ingredients (B). Use a rubber spatula to fold lightly (do not knead). Scale at 7gm each portion, shape into rounds very lightly. Arrange on lined baking trays.
4.  Bake in preheated oven for 20-25 minutes. Remove from oven, dust the top with icing sugar, cool well and store in airtight containers.

  
Cookies # 2 - PINEAPPLE TARTS 
(Recipe adopted from My Kitchen Snippets blog)


Ingredients
226 gm unsalted butter, room temperature
3 Tbsp castor sugar
1-1/2 tsp salt
1 egg yolk
2-1/2 cups plain flour (I used superfine flour)
2 Tbsp cornflour
2-1/2 Tbsp custard powder
2 Tbsp milk powder
1 tsp vanilla essence

Method
1.  Cream butter and sugar in a large mixing bowl until light and fluffy.
2. Add egg yolk and vanilla essence. Beat well.
3.  Sift salt, flour, custard powder, cornflour and milk powder. Mix flour mixture into the butter until it forms a smooth dough.
4.  Remove and let the dough rest for at least 30 minutes.
5.  Roll out the dough abut 0.5cm thick and cut into shape with a pineapple tart mould, or any shape you like with a cookie cutter. Fill the center of the tart with some pineapple jam. Repeat until the dough is finish.
6.  Bake the tarts in a pre-heated oven at 350~F / 180~C until golden brown which is about 15-20 minutes. Cool tarts on the wire rack before storing in an airtight container.

Tips: If you find it difficult to roll out the pineapple jam into a small balls (as it's very sticky), wet your hands, it will not stick ;)

Cookies # 3 - COLOURFUL CUPS
(Recipe adopted from Y3K New Year Cookies Cookbook by Alan Ooi) 


 *Sorry for the blur picture, as the camera I used was not functioning properly.....sigh :(

Ingredients
(A) 200 gm ghee/clarified butter
      100 gm icing sugar
      1/2 tsp fine salt

(B) 340 gm plain flour (I used Superfine Flour)
      40 gm almond powder / ground almond

For decoration : Some yellow, green, red colouring, 100 gm castor sugar

Method
1.  Beat ingredient (A) in a mixer until fluffy. Fold in ingredients (B) and mix to form a soft dough.
2.  Divide no. (1) into 4 equal parts. Leave one part natural, and colour the other three parts seperately, one yellow, one green and one red (I used pink instead of red).
3.  Roll out each piece of dough flat between sheets of plastic. Stack flatten dough one on top of another.
4.  Scale at 10 gm each piece, shape into rounds. Roll over castor sugar and place into paper cups. Arrange cups on tray, and bake in pre-heated oven at 180~C for 15-20 minutes. Leave to cool o the rack, and store in containers.

Cookies # 4 - ALMOND SQUARE COOKIES
(Recipe adopted from Y3K New Year Cookies Cookbook by Alan Ooi) 


Ingredients
(A) 180gm butter (I used Butteroll instead)
      110gm Icing sugar
(B) 1/8 tsp vanilla essence
      1 egg
(C) 180gm plain flour (I used Superfine flour)
      10gm cornflour
For topping: Some Almond flakes
For glazing: 1 egg (beaten)

Method
1.  Place ingredient (A) in a mixer and beat until light and fluffy. Add in ingredient (B) and mix well. Fold in ingredient (C) to form a soft dough.
2.  Grease or scatter some flour on the surface of a 14" x 10" tray. Pour half of portion no.(1) on it. Level with a spatula and bake in a pre-heated oven at 180~C for 12 (Mine baked for about 15 - 17 minutes.) Cut into square pieces of 1-1/2". Cool cookies and then glaze the surface with egg wash. Press almond flakes on top and glaze a second time. 
3.  Bake no.(2) in the pre-heated oven at 180~C for another 5-8 minutes. Cool well before serving.

Cookies # 5 - SEMPERIT BUTTER FINGERS
(Recipe adopted from Y3K New Year Cookies Cookbook by Alan Ooi) 


Ingredients
(A) 250gm Butter
      150gm icing sugar

(B) 1 egg
      1/2 tsp vanilla essence

(C) 360gm  plain flour (I used Superfine flour)
      30gm custard powder
      50gm cornflour
      20gm milk powder

Method
1.  Beat ingredient (A) in a mixer until fluffy. Add in ingredient (B) and fold in ingredient (C) to combine into a dough.
2.  Fill mixture no.(1) into mould and press onto lined baking tray and cut into pieces, spaced apart. Bake in a pre-heated oven at 170~C for 15-20 minutes. Cool well before storing.
 

Happy, Happy Cookies Baking.....lots of em'~


Saturday, February 6, 2010

Kuih Bangkit

Hi! It's February , and I guess to all bakers out there, whenever there is a celebration coming along, you guys will be busy preparing and lining out your list of things to bake for the festive season. Well, this year I was one of them too, as I have started to bake now, I try to make it a point to bake something for my family to celebrate the festivity season, and Chinese New Year falls in this months celebration.
I have flipping my cookbooks over and over again everyday, just like I'm reading a novel.....haha, which is so not me if given the years before. I have never had the interest in flipping a cookbook whether it is for baking or cooking.....but well, what can I say, people do change when they gets older ^-^
So, today I have decided to bake some 'Kuih Bangkit' and fried some 'Seaweed Crackers' for the Chinese New Year celebration, though I knew very well, this end product might not last till that day, hehe, as the kids have already started digging in the minute it came out from the oven  and from the wok. No worries, the only worries would be when no one eats what you make, is it finishes before the actual, that is indeed a good sign.....LOL
Take sometime, to get yourself into preparing these cookies and crackers, it will bring out the Chinese New Year mood in you........and the next thing you know, you will be baking some other things on your list.......cheers, Happy Baking!


KUIH BANGKIT
adapted from the Y3K Cookbook for New Year Cookies
(makes 100 pieces)
Ingredients
3 egg yolks
120gm Icing sugar
150gm concentrated coconut milk
400gm Tapioca flour (stir-fry in a wok on very low heat till flour becomes light, sieve and leave it to cool for a least 2-3 days)

Method
  1. Beat egg yolks and icing sugar with hand-held electric beater till consistency is thick and creamy. Add in coconut milk and mix well, Lastly, stir in cooled tapioca flour and knead dough thoroughly by hand till dough is white and has a light-textured touch.
  2. Pinch small piece of dough and press into kuih bangkit moulds. Cut off excess dough so that the base of cookies remain even. gently knock to dislodge cookies.Place them on lined baking trays. 
  3. Bake in a preheated oven at 170~C for 15-20 minutes. Cookies should be white and not browned. Cool them. Dip the end of toothpick in a little red colouring and dot the cookies if you desire.
Tips:
  • Tapioca flour must be well-fried so it becomes light. the cooling process will enable the flour to absorb in the coconut milk so dough will be soft.
  • Dough must be well kneaded to produce light cookies that can melt in the mouth.
  • You can roll out the dough to a flat sheet and cut out designs with cookie cutter. this way, cookies will not be too firm.
  • Always keep dough covered with a piece of clean kitchen towel to prevent drying out.
  • It is also useful to keep some extra coconut milk aside. Sprinkle a little onto dough when the texture is very dry. Knead well to smoothen it .