Showing posts with label Meringue. Show all posts

Tuesday, April 10, 2018

Homemade Iced Gem Cookies


Gem Cookies......sounds familiar to you? or should I used back it's original name as "belly button cookies"? 😆😆 Those were the sweet memories I have when I saw this in one of the social media, and I thought to myself, I must make this. I have always loved this cookies since I was a kid, and even until now. ........but of course now, I can't take them as I ditched carbs and sugar.,,,,,,,how sad to have to forego these childhood memories treats.....but it's OK, as in the house, there'e my kids and my nieces, and also most of my friends still loves them, that gives me a chance to have the excuse to bake them, LOL

Like I said, I have always wanted to make these Gem Cookies as I would like to have a more buttery cookie base, and the icing on top, I would prefer it to be like a meringue base, crunchy on the outside, and when bite into it, it's a little soft and mellow like there is a hint of marshmallow in it. The original belly button cookie the top was iced with royal icing if I'm not mistaken.....anyway, it still tastes great until today. But today, I'm going to make my version of it, which Cupcake Jemma did just that.....little Gem Cookie iced with Meringue 😋😋

Here is how you do your homemade version of these Belly Button Cookies or the new and more glamorous name now is Gem Cookies , hahaha

https://plus.google.com/u/0/photos/photo/114625954057922568813/6542688428240990482
You may download the above recipe card by clicking unto this link:


Happy baking and hope you like this upgraded version of this cookie ! Tell me how do you like by commenting down below, have a nice day!


Tuesday, March 13, 2018

RAINBOW MERINGUE KISSES......AND I'M BACK


It's been awhile since I last updated my blog......reasons are a lot, and I don't that matters anymore, as I have decided to keep this blog active all over again. Thanks to those who are still actively following me, and because of you, I made a decision to come back and start blogging again. I hope that I'll be able to constantly update and post as often as I can......at least 1 posting a week? 😉

This first comeback posting is a request from my daughter, she has been asking me to bake her meringues since last week, and because I'm tight up with some cake and cookies orders, I wasn't able to until this week where I'm a bit too free, haha.........ya, I meant really very free, until I'm able to finished off a 20 episodes K-series , A Korean Odyssey starring Lee Seung Gi in 3 days 😜

To spice up the meringues a little, I added some food coloring to make it more sweet looking and not so plain as the usual ones. As I'm sure all of you knows that you can easily whipped up a batch of meringues in just less than 10 minutes and what took the longest, was the baking part. As for the ingredients, you only need 2 things - fresh egg whites and castor sugar.

Here is the recipe for those of you who wish to give it a try.


You may download the recipe card above by clicking unto this link:-
https://drive.google.com/file/d/12-hq1flVgdjbiftVfPzooGIE-Tvd7Jxu/view?usp=sharing


Happy baking !

Tuesday, November 1, 2016

I'm Back with a Lemon Meringue Pie

Hi everyone! It's been 4 years since I last posted in my blog, and I've checked it back, it was right after Mooncake Festival in 2012. That was really a blink of an eye, and it's 4 years. I remembered that 4 years ago, I was really tied up with the kids having a transition from primary school to secondary, and mind you, it was a handful, really!!
Anyway, now that my eldest son is completing Form 5 this year, and my youngest girl is completing Primary 6, and if you are my followers, you do know that I have a pair of twin boys, and they are in Form 4, heading to Form 5 next year. 
Oh by the way, I'm happy to introduce to you all the new addition to my family, I have a Tiny Toy Poodle, and she is the apple of the family now, her name is Pixel, and she turned 1 year old in July (same birthday month with me, hehe, in fact one day after my birthday).

  Isn't she a jewel? LOL

Well, I did not stop baking over the 4 years, but just that it was not so much for the family consumption, but more to orders from my other part-time biz - Cupcakes Fairytale. Well, of course, now that I'm back, I will upload and post as much as I can and share with you all just like the olden days.

To start of this first comeback post, I want to share with you the Lemon Meringue Pie that I made over the weekend. It was my first Lemon Meringue Pie, and I must, it was not bad, and in fact, it's good, cos I ate half the pie myself....hehe
As I am a crazy fan of anything zesty, citrus-sy (is there such word), lemon, orange, lime are all my favourite. I never doubt them if I saw them in the bakery shelf. Oh, and the recipe even teaches you to make your homemade version of the Lemon Curd. It was so good, nothing beats homemade, I always says this. Trust me, the curd was not sweet and it has the lemony citrus flavor that makes you just wanna dig the curd from the jar (the leftover one) and eat it on its own. LOL
The sweet shortcrust pastry for the crust base was perfect density, doesn't goes soggy even after pouring in the lemon curd, and even after 3 days in the fridge, it was still crumbly like a cookie and my daughter loves it!


Lemon Meringue Pie
Makes a 9" inch pie 


For the Crust
1 1/2 cup All Purpose Flour
1 Tbsp Castor sugar
1/2 tsp salt
2/3 cup unsalted butter, diced and chilled until ready to use
1 egg (large)
1 Tbsp lemon juice
*A bit of egg white for brushing the shell
  
Lemon Curd
1 1/4 cup castor sugar
1 1/2 cup water
5 Tbsp Cornstarch
5 large egg yolks
A dash of salt
1 Tbsp finely grated lemon zest
1/2 cup fresh lemon juice
2 Tbsp unsalted butter

Meringue
5 large egg whites 
1/2 tsp cream of tartar
5 Tbsp castor sugar
1 Tbsp Cornstarch

Method: 
For Crust
  1. Combine flour, sugar and salt in a bowl. Cut in chilled butter until a rough crumbly texture and bits of butter still visible. You can use a pastry cutter or your fingers to do this.
  2. In a separate bowl, whisk egg and lemon juice together, then pour all into the flour mixture and combine it well, until it comes together into a dough. 
  3. Shape it into a disc and cling wrap it , store in the fridge to chill for an hour. 
  4. Preheat oven to 200C / 400F. On a lightly flour surface, roll out the dough to just about 1/4 inch thick. 
  5. Sprinkle the 9-inch pie pan with flour so that it won't stick, and line it with the rolled out dough.Tuck in the edges and let it go up to slightly over the rim, roll out using a rolling pin to cut off the edges.
  6. Put the pie shell back to the fridge to rest and firm up for 10 minutes.
  7. Once chilled and rested, line the pastry with aluminum foil and let it cover the edges so it won't be burn when bake. Weigh down the pastry with baking beans / dried beans and bake for 10 minutes.
  8. Reduce to 190C / 375F and bake for another 15 minutes. Then remove the aluminum foil and the baking beans , and further bake for another 10 minutes to dry our the center of the shell.
  9. Useful tip: Once you take the shell out of the oven, lightly brush the base of the tart shell with egg white. This is so that the shell will have a shield against the liquid/ curd that we are going to fill in, it will not turn soggy. Cool completely before filling in with the lemon curd.
For Lemon Curd
  1. Whisk sugar, water and cornstarch together in a heavy bottomed saucepot. 
  2. Whisk in egg yolks and salt and cook over low heat for about 5 minutes, whisking constantly. Increase heat to medium and still continue to whisk, cook until the filling becomes glossy and thick. You should be able to feel it as it thickens and coat the spatula / spoon that you are using. 
  3. Remove from heat immediately and stir in the lemon zest, lemon juice and then the butter until it dissolves. Pour immediately into the cooled pie shell and let it cool for 15 minutes. Chill completely before finishing with the meringue, about 4 hours later.
 For Meringue
  1.  Preheat oven to 180C / 350F.
  2. Whisk egg whites with cream of tartar until foamy. While whisking, gradually add in the sugar and whisk on one speed below high until whites hold a stiff peak (meringue will stand upright when the whisk is lifted).
  3. Whisk in cornstarch until fully combine.
  4. Generously dollop over the chilled lemon filling. Use a sweeping motion with your spatula to evenly spread the meringue, let it touched the edge of the curd at the rim, and create your swirl and peaks that look so enticing once browned.
  5. Bake the pie for 10 minutes , or just until you see the meringue browns lightly. Let pie cool or chill until you are ready to slice and eat.


 Happy Baking and Bon Appetit!


Friday, April 30, 2010

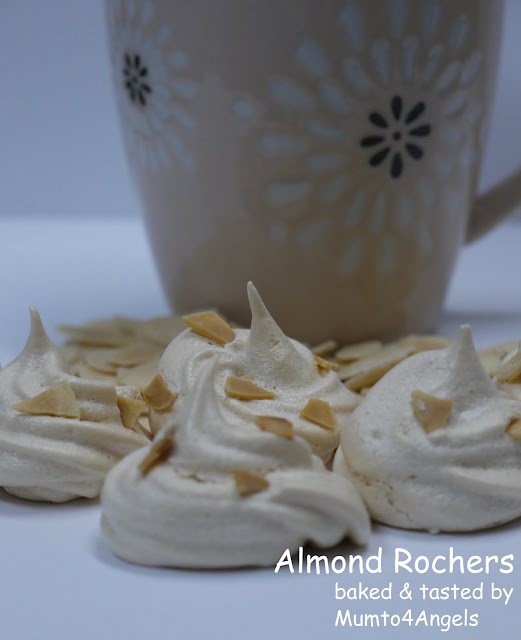
ALMOND ROCHERS


Sometimes, you don't feel like baking something heavy like a cake……..and that's when you think of something that is slightly light and not so difficult to make. I have this recipe kept inside my cookbook file for quite sometime already and always tells myself that I'm going to make this one day…….and definitely will do. Ok, this 'D' day since the weather was really burning hot and humid outside, and I felt just comfortable enough to stay indoor and enjoy the cooling air-conditioning……however not long enough to keep me seated the whole day doing nothing. Just wanted to get to the kitchen and heat up the oven to make something ……crazy huh? That's ME, just can't sit still. I made this 'Almond Rochers' for the kids as they also love anything meringue…^-^
I got this recipe from one of my favourite blogger that I followed and you might be interested to try it out J. Here you are, presenting you the ……..


ALMOND ROCHERS
(Makes about 30 pieces)

Ingredients:

115gm     Sliced almonds
2             Large egg whites, at room temperature
115gm     Confectioners' Sugar / Icing sugar
½ tsp      Vanilla essence
A pinch of salt

Method:
  1. Preheat the oven to 180°C/350°F. Line a baking sheet with parchment paper or a non-stick liner.
  2. Spread the almonds on a baking sheet and place in the oven and toast until golden brown, 7 to 10 minutes. Let cool completely and then break up the almonds with your hands into really small pieces (keep in mind that any large bits of almond will clog the pastry tip).
  3. Pour water to a depth of about 2 inches into a saucepan, place over medium heat, and bring to a simmer. Combine the egg whites, confectioners' sugar, and salt in the stainless-steel bowl of a stand mixer that will rest securely in the rim of the saucepan over but not touching the water.
  4. Place the bowl over the saucepan and continue to whisk until the whites are hot to the touch, use a candy thermometer to test (120°F), about 5 minutes or so. Remove the bowl from over the water and place on the mixer stand. Fit the mixer with the whisk attachment and mix high speed until the mixture is very thick and holds glossy, stiff peaks when you lift the beater.
  5. Fold in the almonds and vanilla essence with a rubber spatula gently until well mixed. Scoop the meringue into a pastry bag fitted with a ½ inch plain tip and pipe onto the prepared baking sheet, forming "kisses" about 1 inch in diameter and spacing them about 1½ inches apart. You can also drop the meringue by using a tablespoon onto the baking sheet.
  6. Place the baking sheet in the oven and keep the oven door ajar with the handle of a wooden spoon to allow moisture to escape and bake at 180°C/350°F for 15 – 20 minutes.
  7. To know if the meringues are done, they puff slightly, crack along the sides, and feel dry on the outside but soft to the touch. They will harden as they cool. Transfer the cookies to a wire rack and let cool. They will keep in an airtight container at room temperature for up to 2 weeks.


ENJOY…..HAPPY ROCHERS BAKING !!

Sunday, April 4, 2010

HAZELNUT COFFEE MERINGUE


Have you ever wonder how to get rid of those 'egg whites' in the freezer after certain recipes you did only requires egg yolks? Hehe.....a useful advice would be to make 'meringue' out of it ^-^ this would be the perfect choice as meringue requires nothing but egg whites. I happened to have 2 egg whites left in the freezer after making a tub of Vanilla Ice-Cream the other day (my first ice-cream attempt, that is). I was thinking to myself I gotta make something with these egg whites before it ended up in the bin soon...... and since Ian has been asking me to make meringue for him for about a week already ........and I kept postponing him due to the fact that I don't want to waste the vice versa (egg yolks).........and I promised him that I'll make some for him as soon as I got leftover egg whites from other baking (having to explain to him that wasting is not a good thing and we should utilise everything if we can ^-^) 
The most recent collection of meringue recipe I got was "Hazelnut Coffee Meringue" which I adapted from DailyDelicious . She has never failed me so far.........and I just love her blogs. A promise is a promise, especially to a child, I never break a promise on my kid as I hate to lose that trust they have in me...........I guess all parents practice that too, right? What is a meringue, for some of you who a e not familiar........it is an airy and light cookies and normally people would use a piping bag to pipe out the meringue into a shape of a 'kisses' or you can always drop a dollop of it by using a tablespoon. Oh yes....for coffee lovers, this is another great recipe for you, you'll definitely like it just as much as Angel, Ian and myself love it , LOL.......Happy Meringue Baking ^^


Hazelnut Coffee Meringue
Ingredients 
2 tsp ...............................Instant coffee granules (I used my Nescafe Gold) 
1 tsp ................................Hot water
3 tsp ................................Coffee flavored liqueur (I used Kahlua) 
114 gm ............................Caster sugar
35 gm ..............................Hazelnut, toasted
60 gm ..............................Egg whites (about 2 egg whites)

Method
  1. Preheat the oven to 350°F . Line a baking sheet with parchment paper or a nonstick liner.
  2. Spread the hazelnut on an unlined baking sheet. Place in the oven and toast until golden brown, 7 to 10 minutes. Let cool completely.
  3. Mix the instant coffee, water and the coffee-flavored liqueur together, set aside.
  4. Pour water to a depth of about 2 inches into a saucepan, place over medium heat, and bring to a simmer.
  5. Combine the egg whites and sugar, in a stainless-steel bowl of a stand mixer that will rest securely in the rim of the saucepan, not touching the water. Whisk together the egg whites and sugar, and then place over the saucepan and continue to whisk until the whites are hot to the touch (120°F using a thermometer), about 5 minutes or so.
  6. Remove the bowl from over the water and place on the mixer stand. Fit the mixer with the whisk attachment and mix high speed until the mixture is very thick and holds glossy, stiff peaks when you lift the beater. Fold in the coffee mixture with a spatula.
  7. Immediately scoop the meringue into a pastry bag fitted with a ½ inch star tip and pipe onto the prepared baking sheet, forming "kisses" about 1½  inches in diameter and spacing them about 1½  inches apart. Or, you can drop the meringue by tablespoonfuls onto the baking sheet. Place the roasted hazelnut on top of each cookie.
  8. Place the baking sheet in the oven and keep the oven door ajar with the handle of a wooden spoon to allow moisture to escape. Bake the cookies until they puff slightly, crack along the sides, and feel dry on the outside but soft to the touch, roughly about 40 – 50 minutes (as individual oven's temperature does varies). Transfer the cookies to a wire rack and let cool. They will keep in an airtight container at room temperature for up to 2 weeks (that is if there are still some left.......haha)
Tip # 1 :  Egg whites will break down in the presence of egg yolk or anything oily, so please make sure that you clean or rinse the bowl and beater with hot water and air-dry thoroughly before starting.


  Happy Meringue Baking !


Sunday, December 20, 2009

Coffee Meringue Cookies

As you all know, I'm a coffee lover and an addict too, I must admit.....hehe. Whatever recipes that I saw that has something that called for coffee or chocolate, I will be very delighted to try it out. Same goes to this recipe that I saw in one of my MiL's cookbook, it's called "Coffee Meringue Cookies". Well, as some of you would know the meaning of 'meringue'....it is a type of dessert made from whipped egg whites and sugar. This would be my first attempt in making a meringue. I got very a very good advice from my sister in KL telling me that whenever you need to whisk egg white and sugar, always make sure that the mixing bowl and the beater are free from oil. If not , the egg whites will break up and you'll never get the level of 'peak' you need.
Therefore, Tip # 1: I rinse my mixing bowl and the beaters with hot water and air dry it before I start to whisk Tip #2 : When seperating the egg white from the egg yolk, do not let even a single drop of yolk fall in to the whites, this will also affect the whisking process....aiyo, you must be wondering what a 'prima donna' egg white I'm dealing with........LOL
So, with the main 2 tips given, I'm sure you will be able to achieve the 'peak' that the recipe called for.........as to be frank with you, meringue is actually a very easy cookie to make.....the kung-fu is all in the whisking of the egg whites and sugar. I followed every single steps the food called for, as it is quite straightforward and easy to understand................and the end result, my kids, especially Ian and Angelica, who just adores coffee as much as their Mummy, loves it so much ^-^ . During the baking of the meringues, the whole kitchen was filled with coffee aroma and the kids just can't wait for it to come out of the oven.......what's more, there is a 'cooling off - period' of another hour after the baking time is up.........LOL, "percubaan" (testing of patience) I call it. These cookies are so, so light and airy.....I meant really light in weight and airy inside, it just melts in your mouth....hmmmm
So, pick up your whisk and get started.......Happy Meringue Baking!


COFFEE MERINGUE COOKIES ......FOR THE LOVE OF COFFEE 
This recipe is adapted from my MIL 's Y3K Cookbook - My Secret Recipes Series Vol.9 

Ingredients
(A) 3 egg whites
(B) 50 gm caster sugar and 120 gm icing sugar (I would suggest you cut down as I find that it's a bit too sweet, maybe 20 gm for caster and 100 gm for Icing sugar)
(C) 1 Tbsp coffee essence
(D) 1 Tbsp cornflour

Method
  1. Beat egg whites in a mixing bowl with a handheld electric beater til it foams. Fold in ingredient (B) in several small batches. Add in ingredient (C) and (D) and beat well till soft peaks form. Do not overbeat.
  2. Spoon mixture into a piping bag fitted with nozzle no.22. Pipe meringue onto a baking tray lined with non-stick parchment paper, all speced apart.
  3. Bake in a pre-heated oven at 100~C to 120~C for 1 hour or more until the meringues are dry and crisp. Cool quickly and store well.
Tips: Always bake your meringues in a very slow oven. To ensure meringues hold its shape after baking, switch off the oven, leave the meringue in the oven with oven door ajar for at least another hour......hehe, testing your patience ^-^, as there will not be a sudden change in temperature, the crisp touch of the meringue will remains better.