Sunday, May 9, 2010

Learn2Bake May Challenge Part 1 – Cupcakes Well Dressed for Happy Mother’s Day


Oh yes, 'Happy Mother's Day" to you all and as Learn2Bake is celebrating Happy Mother's Day with all the members, we are having a challenge tied in to create cupcakes for this occasion. I haven't been making cupcakes lately ( I think the last cupcakes I made for this year was during CNY) and was a bit 'shaky' when piping the buttercream on the cupcakes……LOL, I hope I get them dressed up decent enough, well……..at least presentable to be posted in this blog and also to presented to a dear friend for Happy Mother's Day…..and of course for the Learn2Bake May album ^_^
There are 2 types of cupcakes flavor featured and also 2 types of buttercream to match the cupcakes…….Lemon Cupcakes & Chocolate Cupcakes and as for the frosting, we have Lemon Cream Cheese Buttercream and Chocolate Buttercream. 
This year Mother's Day was a bit of a memorable and special one for me, as I have never baked and sent my cupcakes to anyone before…….this year, I made the Lemon Cupcakes with Lemon Cream Cheese Buttercream and sent them to a dear friend (AO) for Happy Mother's Day..........I have just known her through the L2B Club and I knew we have something in common and I guess we will be good friends in the future. I wish her and her family will have a very warm and Happy Mother's Day…..xoxo

This year's Happy Mother's Day was a bit busy for me, so I managed to only make one batch of the cupcakes and so the Chocolate ones I didn't get the time to do it. Here are the recipe for the Lemon Cupcakes and also the Lemon Cream Cheese Buttercream recipe that I have selected.


LEMON CUPCAKES
(recipe adapted from Cupcakes Bakeshop by Chokylit)
 
Ingredients (Yields 12 regular size cupcakes)
115gm unsalted butter, room temperature
180 – 200gmcastor sugar (please adjust to your own preference)
3 large eggs
190gm all-purpose flour
1 tsp baking powder
½ tsp salt
1 tsp vanilla extract
½ cup milk
3 Tbsp fresh lemon juice
zest of one lemon

Method
1. In the bowl of an electric mixer fitted with the paddle attachment, cream butter and sugar until light and fluffy, about 2-3 minutes.
2. Add eggs, one at a time, beating until incorporated.
3. In a medium bowl, whisk together flour, baking powder and salt.
4. Measure out the milk and vanilla.
5. Add flour mixture and milk alternatively, beginning and ending with flour mixture.
6. Mix in lemon juice.
7. Scoop the batter into the cupcake cups to 2/3 full. Tap the cupcake cups on the table to ensure the batter fills the bottom. Bake at 350~F / 180~C for 20 -25 minutes or until a cake tester comes out clean.

Lemon Cream Cheese Frosting (enough to lightly frost 12-14 cupcakes)

Ingredients
113gm unsalted butter, room temperature
170gm of Philadelphia Cream Cheese
190 – 250gm sifted icing sugar
½ tablespoon fresh lemon juice
½ tsp grated lemon zest

Method
1. Beat butter at medium speed until creamy.
2. Add cream cheese and beat until combined.
3. Sift ½ cup of the icing sugar into the butter and cream cheese.
4. Add the lemon juice and zest. Beat until combined.
5. Add more sugar until you get to the consistency and sweetness you like. You might not need all the icing sugar required.
6. Scoop the icing into a disposable piping bag with your selection of tip and you are ready to frost.

Tip: Always let the cupcakes cool down to room temperature before frosting.


Happy Mother’s Day to All Mothers and Happy Cupcakes baking….xoxo

Wednesday, May 5, 2010

Sausage & Chicken Floss Flower Buns


Yeah, it's Sunday again….meaning I have the whole day to bake something that requires extra time compared to other items and that is ………."BREAD OR BUNS"!!! Yes!!, I just love to bake bread or buns, given the intervals of resting time in between, both for me and the dough, haha………and the outcome is always so satisfying, I just love it !
Today, I'm going to bake some 'Sausage & Chicken Floss Flower Buns', don't get confuse, it's nothing actually compared to the normal Sausage Buns, just that this one, you spread some mayo on the top of the bun when it came out of the oven and then sprinkle some chicken floss on it……..as for the outlook of the bun, it looks kinda like a flower with 5 petals, that's all……..if you don't want all this fancy stuff, just plain Sausage Buns with/ without the chicken floss will be just as yummy ^_^
This time I chose to use the 'Basic Sweet Bun Dough' recipe from one of my cookbook – Y3K Bread Magic by Alan Ooi. This book would be a good investment as the recipes inside are all those commercial buns and breads that we can normally find in the local bakery………well, if you can bake it yourself, then you might not need to visit the local bakery so often like I used to………..plus, you'll have so much satisfaction seeing the bread or buns that comes out from your oven , looking so commercialize leh………^_^, of course practice makes perfect, right………So, Happy Buns Baking today, folks……..cheers!
Oh yes, just to let you know the texture of the buns – it's really soft and even after 3 days in the fridge, when I warm it up in the toaster, it still is very soft and FYI, this time, I did not use the mixer to knead the dough at all……..it's all 100% 'hand-knead' as I want to see the difference. Moreover, to tell you the truth, every bread kneading instruction tells you that you have to pass the 'stretch test' in order to know that your dough is ready,………………but hey, I did not pass the stretch test this time, as after kneading for about 30 minutes, I'm done with all my strength I have……….and call it done. But, the texture was no difference to me at all compared to the one that has passed the test……………..it's just as GOOD and SOFT!! So, start kneading …………..hehe ^_^


Basic Sweet Bun Dough (Straight Dough Method)
Ingredients A:
330gm high protein flour / Bread Flour
½ tsp salt
1 ½ Tbsp Milk powder
60gm Castor sugar
Ingredients B:
1 egg – Grade A
Ingredients C:
120ml water
10gm instant yeast
Ingredients D:
40gm butter

 
Method:
  1. Combine ingredients A together in a mixer (if you are using the mixer) or put on the work surface and make a well in the centre (if you are hand-kneading). Give it a slight blend before adding in ingredients B and C. Beat using a 'S" hook or use a scrapper to combined the ingredients for approximately 5 minutes to form a dough. Add in ingredients D and beat / hand knead for a further 5 minutes until the dough has a smooth surface. * Check whether the dough is fully developed by stretching a small piece of the dough with your fingers. If the dough can be stretched into a thin layer without tearing, it is ready. But if it does not stretch well, then beat or knead further till it passes the next stretch test. (Like I mentioned earlier, I did not pass the test, but my buns are still fine :P)
  2. Remove the dough and leave it in a big bowl, covered with a piece of damp cloth or clingwrap. Leave bowl in a warm place and let the dough to proof for about 30-40 minutes (or even longer if room temperature is not warm) until it doubled in size.
Sausage & Chicken Floss Flower Buns (Yield: 10 Buns)
Ingredients: 1 quantity of 'Basic Sweet Bun Dough'
For topping: 250gm chicken floss, 100gm Mayonnaise and 10 pc chicken sausages
For glazing: 1 egg (beaten)

 
Method:
  1. When the dough is done proofing and has doubled in size, take it out and scale each portion to 60gm (you should be able to get 10 pieces, I got 10).
  2. Take one piece of small dough, flatten it with your palm, and roll it into a long shape, then place a sausage on it, roll to wrap it up.
  3. Use a knife, cut 5 slits on the exterior side and join both ends to form a flower blossom. Do the same with both the remaining dough portions.
  4. Place buns on a greased baking tray, set it slightly apart so that it has room to rise as it will still need a final proofing before baking. Set it aside in a warm place and lightly cover with a cloth or cligwrap and let it proof for another 45 minutes or more.
  5. Once it has doubled in size, preheat the oven to 180~C.
  6. Brush with egg wash and bake for 15 – 20 minutes. Remove from oven, spread the top with mayonnaise and a good sprinkle of the chicken floss. Ready to serve.


Happy Buns baking !~


Tuesday, May 4, 2010

Strawberry Macarons with Strawberry Jam Filling…….my 4th attempt


Hahahaha, do I sound so 'kesian' when you see my post title "4th attempt"…..LOL …..No joke oh, this is really my 4th attempt in making Macarons, and you wouldn't believe it when I said my last 3 attempts ended up all in the bin, and it was so heart breaking that I didn't even want to take a picture to show anyone, aiyo L
But as I told myself, I would give it another try , the last one, before I call it 'done' for Macaron for good……….and thank goodness, this Labour's Day sure paid off. It's actually quite funny, when I woke up this morning, I just felt that I wanted to make Macarons today, and I think today is 'D' day for Macaron and I just felt that I will succeed this time……hehe, six sense konon oh……..LOL
I followed this recipe and was really keeping my fingers crossed all the way that this time I'm going to make it right…….no more flop please…….
You wouldn't believe me when I told you that I actually stand beside the oven, staring at the Macarons, waiting for the 'feet' to appear before my eyes and praying really hard……….as my last 3 attempts, all of them ended up without feet, and some even so runny that it doesn't stay in shape when I piped it on the baking paper. Hey, guess what……after 7 minutes inside the oven, and my constant staring at the oven.......the feet slowly, but steadily and elegantly appear in front of me, ARGH!!!!! and I was like………"I did it! I did it! My Macarons has feet, finally !!!!" in the kitchen ,and the kids came running into the kitchen........in a state of shock.......and ask me what happened. I think they must have thought that their Mummy has gone insane…….after a series of baking…....hehe, sorry Angels………Mummy is just too happy and couldn't believe her own eyes, haha ^_^


I strongly suggest you guys to schedule a time to bake some Macarons. It's just so lovely and beautiful just looking at it, and the texture, it's very light-weight, sweet………and I actually don't know how to describe it…….but one word…..it's awesome and lovely and definitely satisfied!! ………yeah, I know, though the chances of failing is a bit on the high side, but hey, I would say, it sometimes depend on individual too. I have seen countless blogs where they got it at the very first time, some on the second at least. So, here's wishing you all - Happy Macaron baking……..I have already schedule my next Macaron appointment, LOL^_^

Here is where I got this recipe……check it out! I followed exactly as stated…….no alteration at all :P


Happy Macarons Baking ;)
 

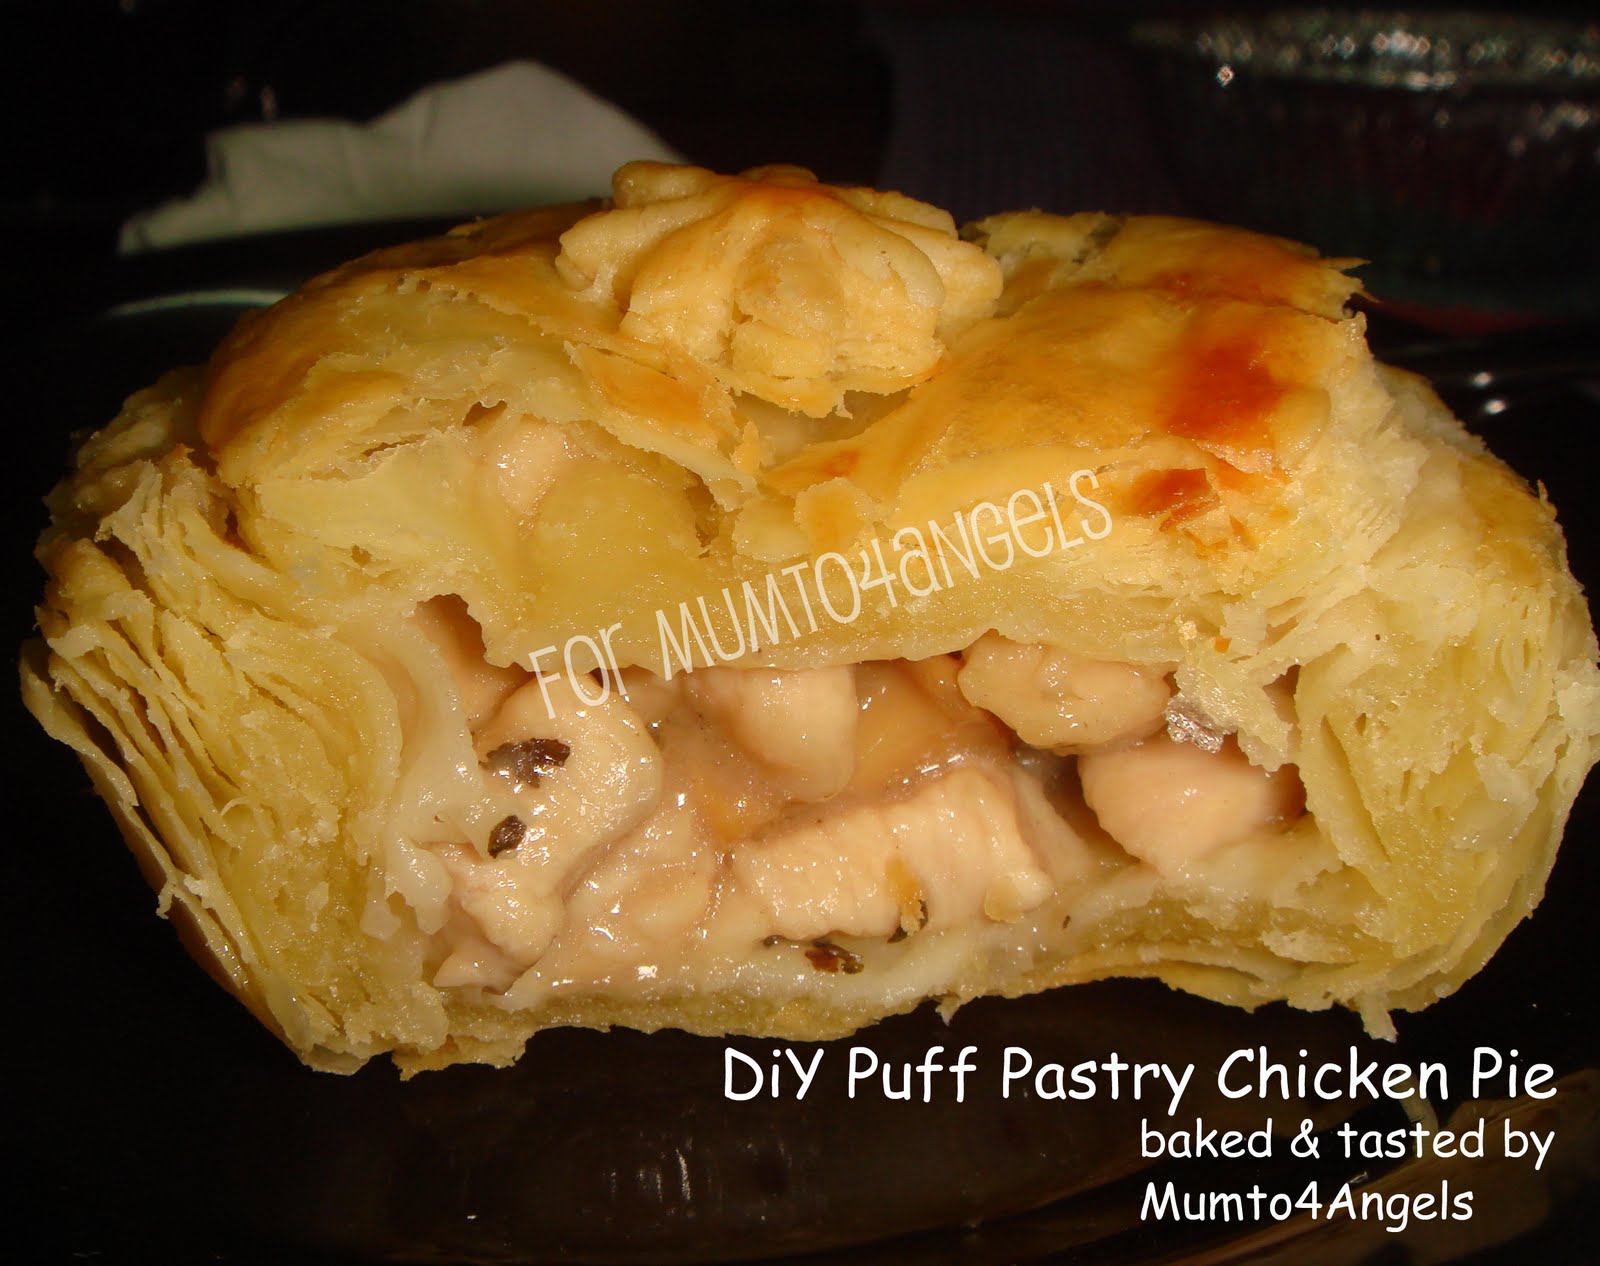
DIY Puff Pastry Chicken Pie


A promise is a promise……..but do accept my apology for the late posting of this recipe as requested by a few of you. I was searching for the photos of this recipe to refresh myself what is it actually……….and I guessed I'm so ooo……….way back behind oh……I have so many recipes posting that wasn't been posted yet…….really sorry about that, will definitely try to make up and catch up too.
In fact the main focus on this Chicken Pie would be the DIY Puff Pastry as the filling can be of anything that you like and comfortable with……..you might like Curry Beef, Mushroom Chicken, or even plain vegetable pie will be good too. Therefore, do excuse me on the recipe for the filling, as I did exactly the same with my previous post on "Chicken Dome Pie"……you knowlah, I'm not a cook when it comes to the wok………so I normally settles down with something that doesn't requires me to a heavy cooking and ended up messing the whole kitchen with splattered oil here and there…..hehe :P
I hope you will be understand the diagram that I have draft out (it's a courtesy from here) to show you how you go about folding the dough and the pastry margarine and to form the layers in a puff pastry. For your information, the more amount of time you fold it, the more layers you'll get ……..and the maximum should be around 5-6 folds, as the more folds you do, the pastry margarine will thins out and eventually, it blends in with the dough already.
So, this is the original recipe and I normally halve it as I find that it's quite a big amount to make the whole ingredient. With the halves, I normally can get about 10-12 pieces of curry puffs or 8-10 chicken pie with a pastry cover……………hehe.


¾ Puff Pastry Recipe
880gm All Purpose Flour / Plain Flour
13gm Salt
510ml water, room temperature
660gm Butter slab / pastry margarine

Method
  1. Sift the flour, mix it with salt and water and form a dough, you might need additional flour to mix it until it doesn't stick to your fingers anymore. Do not over knead it.
  2. Cover the dough with a cling wrap and let rest in the fridge for about 30 minutes.
  3. Roll out the pastry margarine / butter slab to 2/3 of the dough (as shown in the diagram). Make sure that there isn't too much excess dough at the side.
  4. Fold #1 according to the diagram and then Fold #2. Wrap it up with cling wrap and let the dough rest for 30 minutes in the fridge.
  5. The turn the dough 90 degree and repeat the fold #1 and then fold #2 (without the pastry margarine / butter slab of course).
  6. Repeat another 90 degree turn and let it let rest for 30 minutes again in the fridge. (Always remember, puff pastry requires a lot of resting for the dough each time you have fold it….*sigh*).
  7. Then again, repeat the 90 degree fold until you have a good 5-6 turn, where it will gives you approximately 243 layers for 5 folds and 729 layers for 6 folds.
  8. Again…….before you do anything to it, please let it rest again for another 30 minutes….LOL, I know you are getting impatiently already……..:P, but it's a must oh, no joke.
After all the resting is done, pre-heat the oven to 180~C. Now you may cut it into your desired shapes, or use a round cookie cutter of 9-10cm, to cut out a circle and press it into your pie tin, then spoon in some filling, cover it with another layer of puff pastry, the size slightly smaller (about 6-7cm) and seal it with egg whites at the rim of the pie tin. Remember to always use a fork to poke a few holes on the top of the cover to let release the trapped hot air when baking.
Use a pastry brush to egg wash it and bake at 180~C for about 20-25 minutes or until it is golden brown in colour. Take it out, cool on the wire rack and ready to serve.

Happy DiY Puff Pastry Baking ya........;)

Sunday, May 2, 2010

Banana Bread


I haven't yet try baking with fruits as yet …….not for cake and bread, or even cupcakes. But today I had a pretty good chance of baking one as my FiL gave me some very ripe bananas that he has peeled off the skin and kept in the fridge for me after hearing me said the other day, that I would like to try baking something with bananas……hehe, he remembered J
On my way driving home, my head is already searching for the recipe that I have in collection about baking with bananas. I saw this recipe "Banana Bread" on the website the other day and because it has so many good comments about it, I decided to take it down and give it a try one of these days. I am curious too on what will be the difference between this Banana Bread and a Banana Cake in texture………which mean I will be baking a Banana Cake very soon, hahaha.....….stay tuned oh :P
What I found out is, this bread requires a longer baking time, but overall, the texture of the bread was fine, very dense, aromatic and unlike cakes……..it doesn't gives you the richness that a cake does, that will make you feel guilty after having a second piece (hehe)……….and it's not that sweet, so it actually taste really good with a cup of coffee or tea for afternoon tea. Oh yes, one more verdict about this bread is, don't expect it to be moist like a cake, but it's also not that dry too lah.........that it'll stuck in your throat :P, maybe because it falls under the 'bread' category………could it be?
Anyway, I hope you will like this and I have planned to add 2 tablespoons of milk into the batter the next time if I ever make this banana bread again ……just to see if I can add a little moisture into it, ^_^ Happy Banana Bread baking …….cheers!


Banana Bread (Makes 8 – 10 slices)
 Ingredients
250g all-purpose flour (I used Self Raising Flour, therefore I cut down the Baking Powder to ½ tsp only)

2 teaspoons baking powder (I used on ½ tsp)
125g unsalted butter, softened
160g castor sugar
4 ripe bananas, mashed
2 eggs, lightly beaten
1 teaspoon vanilla extract

Method
  1. Preheat the oven to 180°C/350°F. Grease and flour a 19x11cm loaf pan. ( I used a 22x11cm loaf pan instead because I don't have a 19x11cm size)
  2. Sift the flour and baking powder into a large bowl. Set aside.
  3. Cream the butter and sugar until light and fluffy in a separate bowl, then add in the mashed banana and mix well.
  4. Add in the eggs, one at a time until all the ingredients come together, add in the vanilla extract.
  5. Fold in the dry ingredients into the butter mixture part by part until fully combine, being careful not to overmix.

6.   Pour the batter into the prepared pan and bake for 1 hour 15 minutes, or until the read is cooked when tested with a skewer. Leave to cool in the pan for 5 minutes before turning out onto a wire rack to cool. Serve in thick slices with butter and a cup of coffee is perfect!

p/s: I just found out that the banana bread is even better consume the day after....it has become a bit moist after a day.....:)

Happy Banana Bread Baking ;)