Saturday, September 29, 2012

Happy Mooncake Festival 2012 to ALL


Wow, time really pass by so fast....it's Mooncake Festival again!! It seems like its just not too long ago I was  baking and molding mooncake, and now its here again, hehe.
Anyway, Mooncake Festival is a time where family members gather for a reunion dinner and then for a 'mooncake' feast under the bright moonlight with a pot of Chinese brewed tea, chit-chatting about the old times and laughing about it. As for the younger generations, they will lite up their lanterns and walk around the neighborhood on a group. That's how we celebrate it every year too, and to keep this tradition from dying off, I made sure I have homemade mooncakes, colorful lanterns and a pot of green tea or 'Teik Kwan Ying' ready for the sighting of the beautiful full moon with my family.

Therefore, this year I made a varieties, I really meant 'varieties' hehe for this celebration, since there were so many 'outrageous' designs and flavors postings in the blogging community, you just can't resist the temptations, but to make it too, LOL


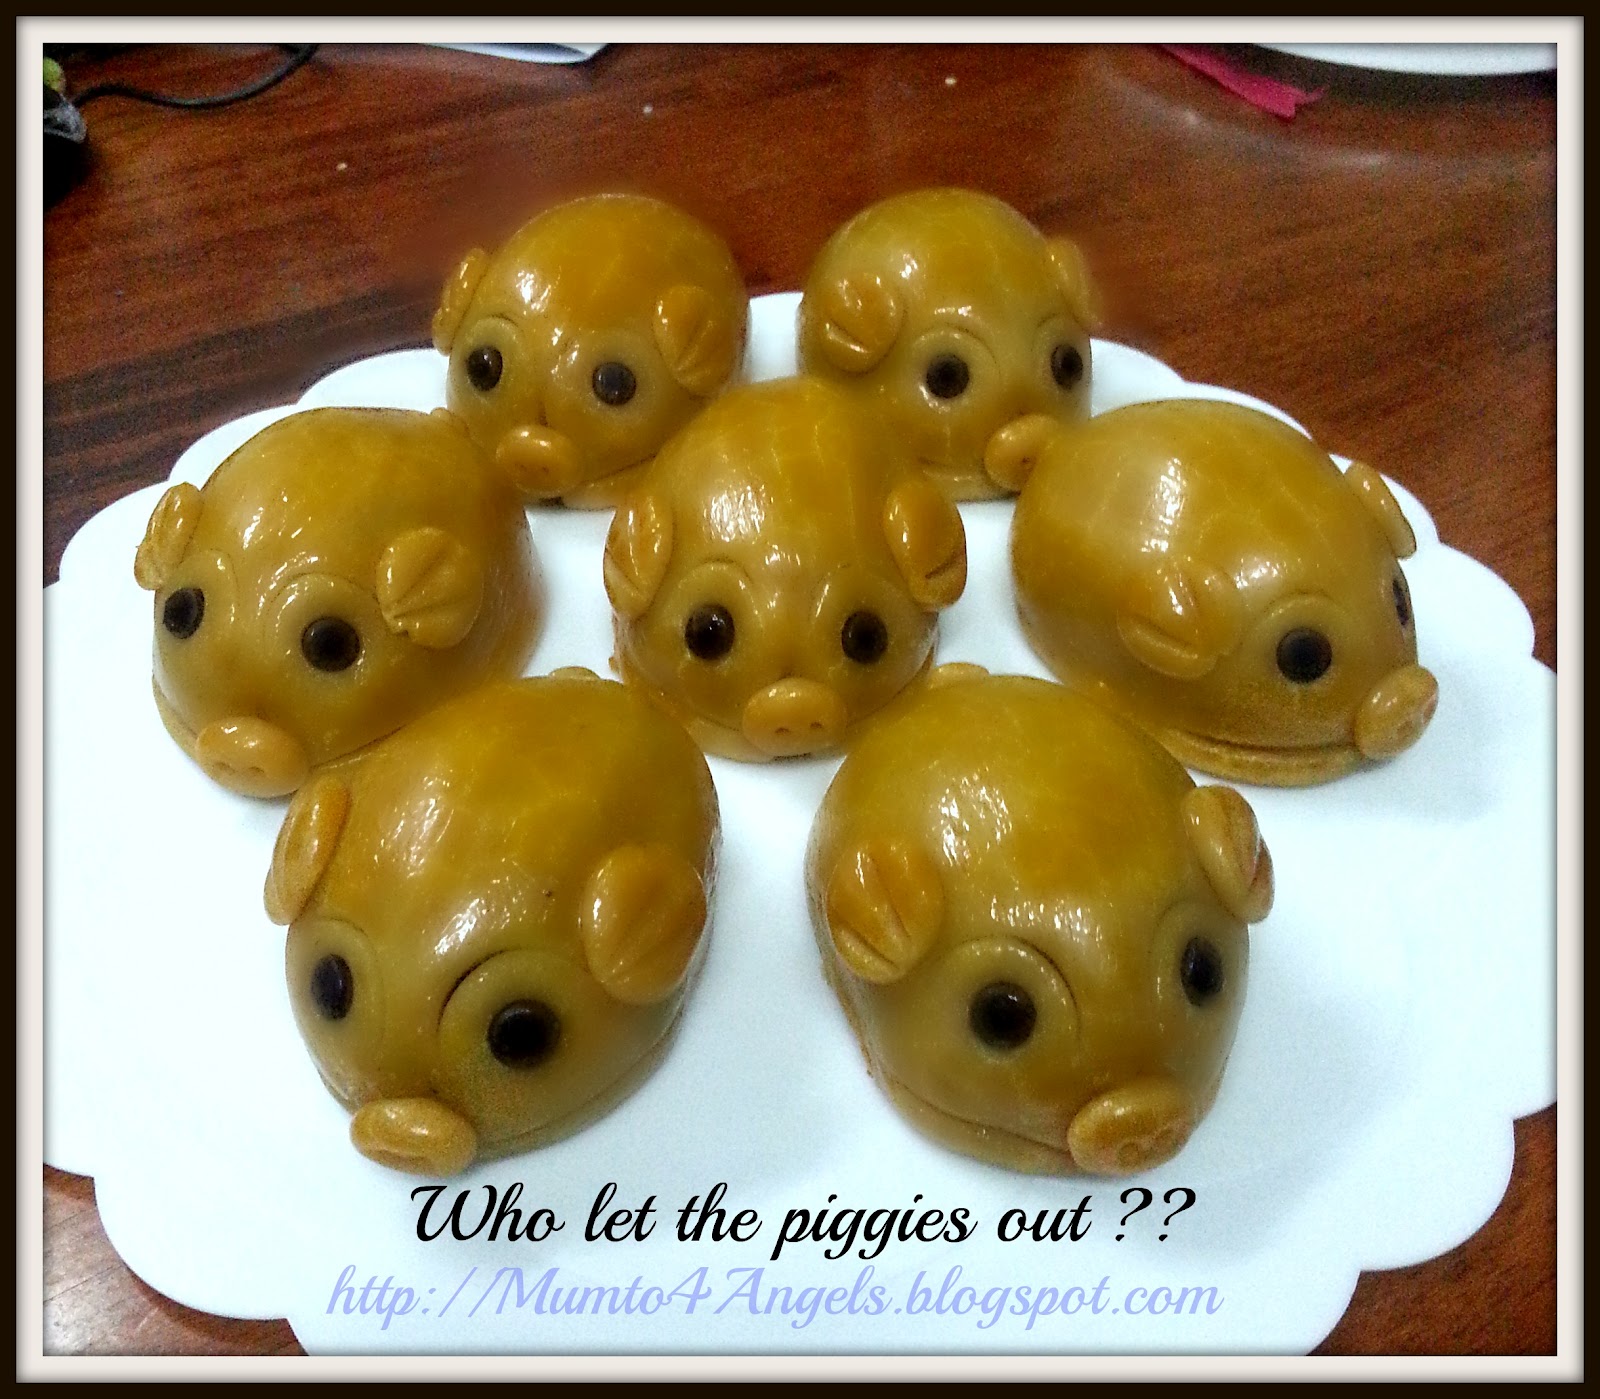
Thanks to ANNCOO's Journal , I have some cute fat piggies for the kids to enjoy their mooncake this year with a little difference, hahaha, thanks Ann! *wink*


Then, of course I made the all time favourite, Snowskin Mooncakes of different fillings flavor from my previous last year recipe that I still find it to be the best one so far :)


However, the older generations still prefers the "traditional baked mooncakes" and of course, I wouldn't miss that. This time for the baked mooncakes, I tried Anncoo's recipe that is the one used on the piggies, and I liked it instantly, as the baked mooncakes turned out very nice, and the patterns are still very distinctive and clear after baking. you might want to give it a try  :)


And so, this year's Mooncake Festival will be of varieties and I'm glad I managed to post it in time before it ended, ahahaha, where I normally did.

Here's wishing all my fellow followers and bloggers, "Happy Mooncake Festival and have a happy and joyful family reunion".


Saturday, September 22, 2012

Durian Tarts


Its been awhile, I felt lazy updating my blog, as I guess I just have so many things to say, and it's kinda hard for me to put them in words to share it with you.  However,I owe it you guys who are a loyal follower of my blogs.......and to compensate it all, here's a really good recipe that I recently tried , which I plucked it out from one of the old cookbook owned by my MiL, hehe


Durian Tarts
Tart crust ingredients:-
240gm plain flour
50gm castor sugar
1/2 tsp baking powder
1/4 tsp salt
125gm butter, cold and cut into cubes
1 egg

Filling ingredients:-
150ml evaporated milk
4 'Grade A' eggs
140gm durian flesh
100gm caster sugar
250ml water
10gm instant custard powder

To prepare the crust:-
  1. Mix the flour, baking powder and salt in a bowl.
  2. Add in the cold cubed butter and rub with your fingers until it resembles breadcrumbs.
  3. Add in the egg and mix until it becomes a ball of dough.
  4. Press the dough into a tart mould, trimming off the edges and the excess with a knife.
  5. Blind bake with some beans on a preheated oven of 180 degree Celsius for about 10-12 minutes.
  6. Remove from the oven and put on a wire rack to cool , remove the beans.
To prepare the filling :-
  1. Combine the durian flesh with castor sugar, custard powder, water and evaporated milk, whisk until well blended. 
  2. Add in eggs, using an electric blender, just pulse the mixture to allow the durian flesh to be pureed, do not blend too long as lots of air bubbles will appear on the tart surface later when baking.
  3. Transfer the mixture to a jar and fill each tart casing with 3/4 full.
  4. Bake on a preheated oven at 200 degree Celsius for 20 minutes or until the durian egg mixture looks set. 
  5. Let cool on the wire rack for about 10 minutes before turning the tarts out of the mould.
Hope you like this, as my family loves it so much, the tarts actually disappear so fast, I had to hide a few for photo taking, LOL....Oh yes, the picture below is the second batch that I made the day after, and this time I made the tarts slightly smaller in size......perfect for a bite-size :)


Till then, enjoy and see you soon!


Monday, July 2, 2012

Viva La Espana.....UEFA Euro 2012


Football anyone? hehe.....I'm a big fan of football (but definitely not the Malaysian ones lah) LOL :p I love watching UEFA Euro games, FIFA Worldcup and of course the English Premier Leagues too. Well, you could have guessed that this posting will be all about football....yes! UEFA EURO 2012 that is!! 
I don't know how many ladies in my group would be that crazy to set their alarm clock to 2.30AM everyday for a month to get up and sit in front of the TV to watch the match, hahaha, but I'm one of them. Hubby would love to company me, but each time when the alarm clock rings, he would say, he would love to continue sleeping and dreaming instead ....huh! I don't care if I'm watching it alone, I just want to watch!! That's how crazy I can be :)

Anyway, a month has passed by, and today is the last "final" match of the Euro game, and that left the two team to compete for the UEFA EURO Cup 2012  -namely SPAIN vs ITALY. I am a fan of both, but when  given a choice to choose only one, Spain is my favourite ....all the way from WC2010. My favourite players would be Fernando Torres, Sergio Ramos, Iniesta, Fabregas, David Silva and in fact , the whole team , LOL 

What's more, Spain started with a 2-0 in the 1st half and another 2 more goals in the 2nd half, closing the game with 4-0 to Italy.......I jumped and screamed to my feet with joy, LOL. That was an awesome match and everyone performed really well, and I can feel the joy of Spain in celebration........but also the sadness of Italy for losing so badly :(

Spain beats Italy in the final of the UEFA EURO 2012 with a 4 - 0

Wow!! that was great news and how could I not celebrate this victory? So I decided to bake a batch of  "Double Chocolate" flavour cupcakes to celebrate with Spain, hehe :P
I actually posted these cupcakes in my other blog - Cupcakes Fairytale, but however, I am featuring it here to so that you could join me in the baking and celebrating of this great moment :) 
And so here is the recipe to the "Double Chocolate"flavour cupcakes.....courtesy of Cupcakes Fairytale , hope you like it :)

DOUBLE CHOCOLATE CUPCAKES
(Makes 18 cupcakes)

250gm plain flour, sifted 
250gm butter, softened to room temperature
180gm castor sugar
4 Tbsp of cocoa powder, sifted together with the flour
1 tsp Rum / Kahlua / Brandy *Optional
1 tsp baking powder
1 tsp bicarbonate soda
3 eggs
40 ml milk

For the Chocolate Ganache
100gm Chocolate, chopped into small pieces
50ml Double cream
  •  Heat the cream in a saucepan to boil , then take it off the heat. Pour in into the chopped chocolate and leave it for 1 minute. Stir it to melt the chocolate, and leave it to cool slightly, until ready to use.
Method
  1. Preheat oven to 160 degree Celsius. Line the cupcakes cases on the baking tray.
  2. Beat the butter and sugar on medium speed until light and fluffy. 
  3. Sift the flour, cocoa powder, baking powder and bicarbonate soda, set aside.
  4. Lower down the mixer speed to medium-low and add in the eggs , one at a time, making sure that it is well combined.
  5. Add the milk and Rum/ Brandy / Kahlua, whichever you are using, and mixed well.
  6. Add in the cocoa/ flour into the mixture , slowly , batch by batch and mix until all fully combine.
  7. Scoop the batter 1/3 into the casing, then scoop a tablespoon of the chocolate ganache into the center of the batter, and then top it with another 1/3 of the batter, filling 2/3 of the casing. Repeat this to all the other casings.
  8. Bake at the preheated oven for 20-25 minutes depending on individual oven. However, the cupcakes are done once a skewer inserted in the centre, comes out clean.
  9. Leave it to cool on the wire rack.

To make the decoration, cover the top of the cupcakes with buttercream , smooth it to the brim (I used 'pink' tinted buttercream)and place a piece of the specially ordered  'UEFA EURO 2012 logo edible image icing that I ordered from one of the local provider - Sugar Art.

Well, till then......have fun making these cupcakes and again ....."Viva La Espana!!!"


Thursday, June 21, 2012

Strawberry Sorbet....to cool off


Hi peeps!! How are you all doing? i have been feeling a little irritated and lousy lately.....well I blamed it totally to the 'fiery' hot weather. It's like an overheated oven in the morning till late evening, then it started to pour in the middle of the night. Then lately, it's getting more heated up where not a drop of rain was being released from heaven.....sigh!!
However, the reason me being irritated was not really the cause of the heat, but more to the irritating 'trying to control everybody, especially the kids' kinda attitude of my MiL. Well, not that she only started to be like this lately, it was since long time ago........but lately it's getting more overboard, and sometimes I just can't take it anymore .....but still persuaded myself to keep calm and cool. With the weather and the heat like these days..........I sometimes just don't know how long I can bear to withstand and not burst!!! LOL.......
What on earth was I thinking when I agreed to Hubby to move back into that house??!! Well, I know damn well why I agreed.......I was left with no other choice :(
Argh!!!! I need a punching bag where I can punch and kick my heart out.....and yet, not in the sight of Hubby, as this will put him in a difficult position ........ya, ya, I know how it works, and I hate it!!!! I really envy those of you who has your own little nest, it doesn't have to be big, it doesn't have to be bold, as long as it's something that you can call your own @-@ The most that I envy of you all  are those of you who still has a 'mother' to go home to when your mind are troubled by all these stupid things!!! Well, I know I can only just wish and wish .....but nothing will happen :P
Sorry to bored you peeps with my little 'babble'....LOL....so I made "Strawberry Sorbet" for you to compensate for the boredom ....hahahaha, kidding! Anyway, this Sorbet was really good, though I find it a little sweet, but will definitely cut down the sugar next time I make again. Angel likes it to the max, and she is the only one patronizing it, as the boys don't fancy 'strawberry' which they thinks that strawberry is for 'girls'.......hmm, that make me wondered a while, then what's for boys?........Banana? Watermelon? hmm........

Its super easy to make, but I must say this only works well if you have an ice-cream maker, as for those of you who asked me if you can do it without the maker.....totally, I doubt!! For hot humid weather like ours, this sorbet is really refreshing and cooling and though its sweet, it still is a perfect solution for times like this!!


Here's the recipe, and the source of this is from "Sweet Scoops" by Shelly Kaldunski (Page 74, initial recipe title was 'Strawberry -Basil Sorbet', but I choose not to put the basil, cos the kids don't like that)


STRAWBERRY SORBET
Makes about 1 quart

Ingredients
3 cups strawberries, hulled and cut into half
2/3 cup sugar, you may want to decrease if your strawberries are the sweet type
2 tsp fresh lemon juice
Pinch of salt

Method
  1. In a bowl, stir together the strawberries and sugar. Cover with cling wrap and let stand at room temperature until the berries release some of their juices and the sugar is completely dissolved, about half an hour.
  2. Pour the strawberry mixture into a blender or food processor and add in the lemon juice and salt. Blend until very smooth. Transfer the blended fruit to a bowl, cover, and refrigerate until cold, at least 2 hours or up to 1 day (mine was half a day).
  3. Pour the cold strawberry puree into an ice-cream maker and churn according to the manufacturer's instructions. Spoon the sorbet into a freezer-safe container  and place a piece of parchment paper or waxed paper directly o the surface. 
  4. Cover tightly and freeze until firm for at least 2 hours or up to 3 days. 
Enjoy!


Tuesday, May 8, 2012

Blueberry Yoghurt Oreo Chiffon Cake


This week has been quite a busy week for me, as I was flying to 2 destinations within a period of one week, though there was a few days break in between. I was in KL on a Friday and back on the same day, then the following Wednesday, I was on a 2D1N to Sandakan. The last trip I was in KL was during the Chinese New Year, and whereas the last time I was in Sandakan was last October for our company's roadshow.
Anyway, since I was back in time for the weekend, and Saturday was a PH - Wesak Day, so I planned it out that I will bake something.
I have recently been busy with my 'Sugar Cookies' preparation for two June wedding orders. Though you might say that I still a month to get things done, but because I'm doing every little piece of work all by myself, so I really need the time planned out nicely , in order I don't have to rush things last minutely :P
As you might have known, I'm a mother of 4 and juggling work and orders at the same time.........it has never been easy, but I like it, as I find that these are the things that keeps me young and energetic (or at least I thought so, hehehe).
OK, today I chose to bake something light and healthy, not something that is rich, creamy and cheesy  (although that is what I normally like).......and tadah......."Blueberry Yoghurt Oreo Chiffon Cake".
Hope you like this cake, as I found that it's really soft, moist and light at the same time. My kids used to comment Chiffon Cakes to be a bit dry, although they like the fluffy soft texture, but this one, the whole cake was gone in a short half and hour. Luckily, before I lay it on the dining table for them to eat, I managed to cut 1/3 of it to be given to Ian's friend (Jonathan)'s mum, Judy.  She texted me the following morning saying that her husband and Jonathan loved the cake very much, but they find that it's a little bit sweet. I could have guessed as I did not lessen the sugar usage (which I should have, forgotten about it) and because the blueberry yoghurt is already a sweetened one, so it definitely adds additional sweetness to it. (p/s: So remember to adjust your sugar level when you make ya, as I will be posting the original recipe, without my alteration) ^-^

The 24" inch tube pan.........ready for baking now
Here it is the recipe for :
BLUEBERRY YOGHURT OREO CHIFFON CAKE
Ingredients
150gm cake flour
100gm blueberry yogurt (I used Nestle Low fat blueberry yoghurt)
6 eggs yolks, room temperature
1 tsp baking powder
100gm castor sugar
A pinch of salt
100gm vegetable oil (I used Canola oil)

6 egg whites, room temperature
1/4 tsp cream of tartar
100gm castor sugar (please decrease if you want a less sweet cake - 70gm would be fine)
50gm Blueberry Oreo Cookies, cut into tiny chunks
some blueberry paste or purple colour for the purplish look, optional *

Method
  1. Pre heat your oven to 150 degree Celsius, middle rack.
  2. Whisk the egg yolks and castor sugar in a medium bowl , till light pale and double in size.
  3. Add in the blueberry yoghurt, and then the oil. Mix in till blended, then add in the sifted flour + baking powder and salt. Mix until the batter is fully incorporated, set aside.
  4. In another mixing bowl, whisk the egg whites and cream of tartar till frothy, slowly add in the sugar in a few batch while whisking. Whisk until soft peak and glossy.
  5. Add 1/3 off the egg white meringue into the egg yolk batter and gently fold in using a spatula till combined. Add in the remaining egg white meringue to the batter, and continue to fold in until its fully incorporated.
  6. Pour half the batter into a 22" inch tube pan (I used a 24" inch tube pan, cos I don't have a 22"), sprinkle the Blueberry Oreo chunk bits on it, then pour the remaining batter and sprinkle the rest of the Oreo blueberry chunks.
  7. Bake in the oven for about 50 minutes or less (depending on your oven), or until the skewer inserted to the centre of the cake, comes out clean.
  8. Take the cake out of the oven, turn your tube pan upside -down and let cool. Once it's cool, use a sharp knife to release the side and the centre of the cake, and bring the cake to completely cool on the wire rack. 
  9. Enjoy!!

Happy Baking ladies and Happy Wesak Day to those who are celebrating!!

p.s : By the way, just a sneak peek for you guys on how my little girl, Angelica invent her own play toys and stuffs. .....hehe

She used a box to build her 'house'....
Angel taking a nap in her 'house'......
See how slumber my little girl is, sleeping in her DIY 'Home Sweet Home'.....hahaha