Friday, April 30, 2010

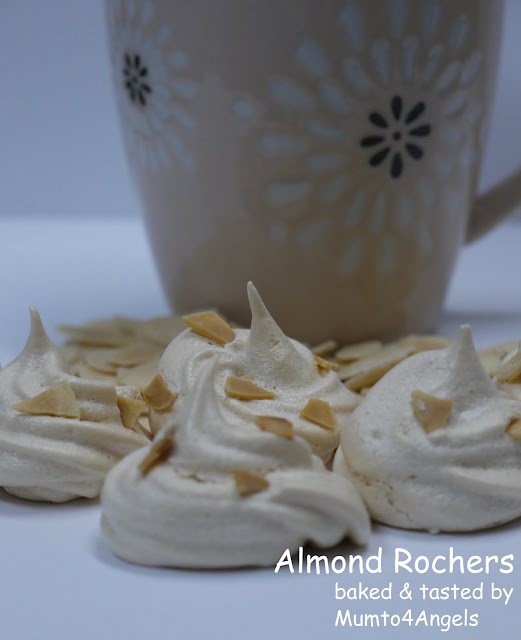
ALMOND ROCHERS


Sometimes, you don't feel like baking something heavy like a cake……..and that's when you think of something that is slightly light and not so difficult to make. I have this recipe kept inside my cookbook file for quite sometime already and always tells myself that I'm going to make this one day…….and definitely will do. Ok, this 'D' day since the weather was really burning hot and humid outside, and I felt just comfortable enough to stay indoor and enjoy the cooling air-conditioning……however not long enough to keep me seated the whole day doing nothing. Just wanted to get to the kitchen and heat up the oven to make something ……crazy huh? That's ME, just can't sit still. I made this 'Almond Rochers' for the kids as they also love anything meringue…^-^
I got this recipe from one of my favourite blogger that I followed and you might be interested to try it out J. Here you are, presenting you the ……..


ALMOND ROCHERS
(Makes about 30 pieces)

Ingredients:

115gm     Sliced almonds
2             Large egg whites, at room temperature
115gm     Confectioners' Sugar / Icing sugar
½ tsp      Vanilla essence
A pinch of salt

Method:
  1. Preheat the oven to 180°C/350°F. Line a baking sheet with parchment paper or a non-stick liner.
  2. Spread the almonds on a baking sheet and place in the oven and toast until golden brown, 7 to 10 minutes. Let cool completely and then break up the almonds with your hands into really small pieces (keep in mind that any large bits of almond will clog the pastry tip).
  3. Pour water to a depth of about 2 inches into a saucepan, place over medium heat, and bring to a simmer. Combine the egg whites, confectioners' sugar, and salt in the stainless-steel bowl of a stand mixer that will rest securely in the rim of the saucepan over but not touching the water.
  4. Place the bowl over the saucepan and continue to whisk until the whites are hot to the touch, use a candy thermometer to test (120°F), about 5 minutes or so. Remove the bowl from over the water and place on the mixer stand. Fit the mixer with the whisk attachment and mix high speed until the mixture is very thick and holds glossy, stiff peaks when you lift the beater.
  5. Fold in the almonds and vanilla essence with a rubber spatula gently until well mixed. Scoop the meringue into a pastry bag fitted with a ½ inch plain tip and pipe onto the prepared baking sheet, forming "kisses" about 1 inch in diameter and spacing them about 1½ inches apart. You can also drop the meringue by using a tablespoon onto the baking sheet.
  6. Place the baking sheet in the oven and keep the oven door ajar with the handle of a wooden spoon to allow moisture to escape and bake at 180°C/350°F for 15 – 20 minutes.
  7. To know if the meringues are done, they puff slightly, crack along the sides, and feel dry on the outside but soft to the touch. They will harden as they cool. Transfer the cookies to a wire rack and let cool. They will keep in an airtight container at room temperature for up to 2 weeks.


ENJOY…..HAPPY ROCHERS BAKING !!

Monday, April 26, 2010

Challah…Braided Bread Loaf


I haven't been making bread for quite sometime already…….hmm, time to start again because I still have 2 packets of High-protein flour and bread flour in my storage, before they hit the expiry date, I'd better used it up first, hehe. This bread called 'Challah" really got my attention when I was browsing through one of my favourite bloggers post. The color and the outlook of this bread loaf was really beautiful, so neat and it gives you the kind of feeling where you would wanna make one immediately :PI wished I could bake bread during the weekdays, but too bad, because I normally reach home quite late at night (around 8pm) from my in-law's house………therefore bread baking is really not possible, as you knowlah, it requires a lot of proofing and resting time for the dough. So, I patiently waited until Sunday to do it ^_^ Everyone in my home is a bread lover, so I normally don't need to worry about baking a big loaf as it will definitely not go to waste. I found this recipe here, and if you love 'braided bread', you will love this one…..because I will definitely make again soon J ………….Happy Bread Baking, guys!


Challah
(Makes 1 'big' loaf)

Ingredients
550gm………………………………………………… unbleached all-purpose flour, plus extra for dusting work surface
¼ cup………………………........................... sugar
2 ¼ teaspoons .................................. instant yeast
1 ¼ teaspoons ................................... salt
2 ..........................................................large eggs 
1 .......................................................... large egg yolk
4 tablespoons…………………................... unsalted butter, melted
½ cup plus 1 tablespoon ................... warm water (about 110 degrees F)
............................................................ large egg white (for egg-wash)
1 teaspoon .......................................... poppy or sesame seeds (optional)

Method
1. Whisk together 3 cups flour, sugar, yeast, and salt in medium bowl; set aside. Mix together 2 eggs, a yolk, melted butter, and ½ cup water in a bowl of stand mixer fitted with dough hook. 

2. Add flour mixture to wet mixture; knead at low speed until dough ball forms, about 5 minutes, adding remaining ¼cup flour, 1 tablespoon at a time, as needed to prevent dough from sticking. Whisk reserved egg white with remaining 1 tablespoon water in small bowl, cover with plastic wrap, and refrigerate.

3. Transfer dough to a lightly oiled large bowl, turning dough over to coat with oil. Cover with plastic wrap and let rise in warm place until doubled in size, 1½ to 2 hours.  Gently press dough to deflate, cover with plastic wrap again, and let rise until doubled in size, about 40 to 60 minutes.


4. Lightly grease large baking sheet and set aside. Transfer dough to a lightly floured work surface. Divide dough into 2 pieces, one roughly half the size of the other. (Small piece will weigh about 9 ounces, larger piece about 18 ounces.) Divide large piece into 3 equal pieces. Roll each piece into 16-inch-long rope, about 1 inch in diameter. Line up ropes of dough side by side and pinch ends together. Take dough rope on left and lay it over center rope. Take dough rope on right and lay it over center rope. Repeat until ropes of dough are entirely braided, then pinch ends together. Place braid on baking sheet.

5. Divide smaller piece of dough into 3 equal pieces. Roll each piece into 16-inch-long rope, about ½ inch in diameter. Braid together, pinching ends to seal. Brush some of egg wash on top of large loaf and place small braid on larger braid. Loosely drape loaf with plastic wrap and let rise in warm place until loaf becomes puffy and increases in size by one-third, 30 to 45 minutes.

6. Adjust oven rack to lower-middle position and heat oven to 375~F / 180~C. Brush loaf with remaining egg wash and sprinkle with poppy or sesame seeds, if using. Bake until loaf is golden brown and instant-read thermometer inserted into side of loaf reads 190 degrees, 30 to 40 minutes. Place baking sheet on wire rack. Cool loaf completely before slicing.

Happy Challah Baking , folks!

Saturday, April 24, 2010

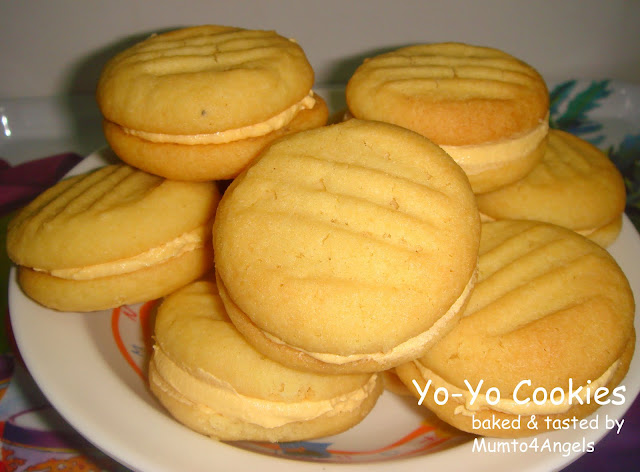
YO-YO Cookies with Buttercream Filling


Ian is going to a friend's house to do some school project and he politely asked me if I can bake something for him to bring over to his friend's house…..like cookies J. Of course, I'd be delighted to if you think Mummy's food is good enough to be presented in front of your friends, I said………^_^ and he assured me that he is very proud of my creation……LOL……thanks dear. So I baked him some 'Yo-Yo Cookies' which I think would be perfect for the kids as its soft and sweet and has a filling sandwiched in it……..where I personally think kids just loved sandwich cookies. I can still remember my 4 kids……..whenever they eat OREOs …..they would open up the cookie and licked off the vanilla cream first before they eat the cookie…….haha…….so I bet this would be a good choice ;)It's really easy to make and with this recipe, I managed to get 16 pairs of Yo-Yos……..the only thing is I find the cookies a bit sweet when the buttercream filling was in it, so maybe the next time I make, I'll cut down on the sugar from the cookie recipe from 60gm to 40gm instead (you might want to take note of this too). By the way, you can even sandwich with whatever filling you like……example: strawberry jam, peanut butter, chocolate ganache and etc…….
Here's the recipe and hey, do get your kids to involve in the sandwiching…..they'll have fun and mine were mostly done by Angelica…….LOL
Happy Yo-Yo Cookies baking J


YO-YO Cookies with Buttercream Filling

Ingredients
125g unsalted butter, softened
100g ghee
60g icing sugar (can be reduced)
120g plain flour
120g self-raising flour
60g custard powder


Icing Filling
80g unsalted butter, softened
110g icing sugar
½ tsp vanilla extract

Preparation
1. Preheat oven to 180°C. Lined two baking sheets with parchment paper, and set aside.
2. Sift together plain flour, self-raising flour and custard powder, set aside.
3. Cream butter, ghee and icing sugar until light and fluffy. Mix in flour mixture to form a soft dough.
4. Divide dough into about 25g each, about 24 - 25 portions. Roll each into a ball and place on a baking tray. Use the prongs of a fork to flatten the balls.
5. Bake for about 15- 20 minutes. They will still appear soft to the touch. As the freshly baked biscuits are quite fragile, cool for 5 – 7 minutes on the tray when they have hardened a bit, before removing to a cooling rack.
6. Once cold, pipe a little filling onto the flat side of half the biscuits, and sandwich it together with another biscuit to make a Yo-Yo.


Icing Filling:Cream together butter, icing sugar and vanilla until soft and fluffy. Fill into a piping bag fixed with a star nozzle (I just used a palette knife to spread the buttercream, hehe, lazy lah to use a piping bag)


Happy Yo-Yo Cookies Baking !


Tuesday, April 20, 2010

Chicken Curry Puffs (Shortcrust Pastry)


This would be my first attempt in making Curry Puffs and I understand that there are a few types of pastry to make the skin……..(1) Shortcrust Pastry (2) Puff Pastry and (3) Nyonya Flaky Pastry. Today I'm going to try to make 2 out of the 3 as mentioned…….and that is Shortcrust and Puff Pastries. I have a helper (Shirley) and a taster (Winnie) to see me to it……haha, no lah, just kidding, they are my two good friends that happened to be visiting me today. I have already got the Curry Chicken for the filling cooked earlier (yesterday evening) to save a bit of my time, as you know lah, I'm a lousy cook when it comes to wok…..:P
I have done both this pastries before and therefore I would say the chances of succeeding should be quite promising, LO ^-^ As Shirley is still very new to baking, she told me that she'll be here to see how I get things prepared, then the rolling out of the dough, filling in the pastries and then baking it. As for Winnie, she is more to tasting the end-product, hehe. In fact, this is also the first time I actually had someone here, watching me bake......kinda makes me feel nervous though, hehe. So, the following is the ingredients used to prepare the Curry Chicken (filling) and also the Shortcrust pastry. By the way, this recipe was from Corner Cafe


Ingredient for Curry Chicken
250gm of chicken breast fillet, diced and marinated with 1 tsp light soya sauce, ½ tsp sugar, ¼ tsp salt and a pinch of ground white pepper
350g potatoes, peeled, boiled until semi-soft & diced
1 small onion, peeled & chopped
1 clove garlic, peeled & chopped
2-3 tablespoons canola oil
1 ½ tablespoons meat curry powder, dissolved in 1 ½ tablespoons water
3 tablespoons coconut milk powder, dissolved in 3 tablespoons water
2 teaspoons sugar, or to taste
1 teaspoon salt, or to taste
dash ground white pepper
finely chopped fresh red chilli, or chilli powder, to taste (optional)

Shortcrust Pastry:
240g plain flour
60g cornflour
1 teaspoon baking powder
25g (1 ½ Tablespoons) caster sugar
½ teaspoon salt
75g cold lard, cubed
75g cold butter, cubed
1 egg, lightly beaten
30-40ml water, adjust as necessary

1 egg yolk with about 1 teaspoon egg white, lightly beaten for eggwash

Preparation
Filling:
1. Marinate diced chicken for at least 1/2 hour.
2. Heat the wok, add canola oil and sauté chopped onion until translucent and fragrant. Add chopped garlic and stir-fry until fragrant. Add curry powder paste and stir-fry until fragrant.
3. Add marinated chicken and stir-fry until colour changes. Add cooked diced potato and dissolved coconut milk powder and stir to combine. Seasoned to taste with sugar, salt and pepper. Cook briefly until the filling is dry. Remove to a plate and let cool. When it is cold, cover and chill in the refrigerator until ready to be used.

Shortcrust Pastry:
1. Sift plain flour, cornflour, baking powder, sugar and salt into a big mixing bowl and mix together.
2. Add cubed lard and butter. Rub into the flour mixture using your fingertips until the mixture resemble breadcrumbs.
3. Add lightly beaten egg and about 20ml water into the flour mixture. Cut through the mixture with a bread knife to combine. Once the mixture starts to cling together, use your hand to press together into a dough. Try not to knead too much if you can. If the mixture is still crumbly and does not form into a dough, add a little bit more water to bind. Shape the dough into a ball then flatten. Wrap the dough with cling film and chill in the refrigerator for 30 minutes in hot weather. If the weather is cold, it can be left, wrapped, on the kitchen bench for 30 minutes without chilling.
4. Remove dough from the refrigerator and let it become pliable again before rolling out. Preheat oven to 180°C.
5. Roll out the dough with floured rolling pin to about 4mm thick on lightly floured surface.
6. With a floured 10cm round cutter, cut out rounds of pastry.
7. Spoon about 1 1/2 to 2 teaspoons cold filling into the centre of each pastry round. Fold the pastry over to half-moon shape to enclose the filling and seal by crimping the edges into rope shape. Arrange the pastry on a lined baking sheet.
8. Eggwash the top of each pastry. Bake for about 25 minutes, or until the pastry is golden brown.
 

Cute Animal Cookies


OK, so this weekend I didn't get to bake anything big because I was working, but it just doesn't feel right to see the kitchen being so quiet and the oven being unheated....hahaha, I know I sounded crazy, but that's just me :p I just have to bake something today because if not, I won't be in peace the whole day. The other day, I bought a set of 'Animal Cookie cutters' and they are just so cute........heh, now I have an excuse to bake.......LOL, and Angelica totally demanded that I do too, because she saw those lovely cutters and just couldn't wait to eat a cookie made out of it ^_^

I picked a very simple cookie recipe from one of the my newly invested cookbook, hehe – "50 All Time Favourite Bakes by Seashore Publishing (M) S/B" at a very special promo price of RM9.90 at Popular Bookstore (usual price RM21.90) and it's called the "Animal Cookies'. The cookies turned out really cute with the 'animal prints' on it, and it sure makes the kids 'ooh-ing' and 'wah-ing' all the way when it came out of the oven.......LOL

And this is the recipe, it's very simple and it can be prepared and done within less than 40 minutes. get your kids to involve and have fun ..........as usual, Happy Cookies Baking from me to you ^-^


Animal Cookies

Ingredients 
(A) 
150gm Unsalted Butter
50gm Icing Sugar
50gm Brown Sugar
1 tsp Vanilla essence
2 Egg Yolks
1 Egg white
Pinch of salt
Pinch of Ground Cinnamon (optional)

(B)
325gm All-purpose Flour / Plain Flour
50gm Milk Powder
30gm cornflour
½ tsp Baking powder 

Method
  1. Pre-heat oven at 180~C and line 2 baking tray with parchment paper or lightly greased it.
  2. Beat (A) till light and fluffy.
  3. Sift (B) and fold in lightly into (A) until a dough is form.
  4. Roll the dough into 3mm thickness and use the animal cookie cutter to shape it. Place onto a greased tray or on parchment paper, bake for 20 minutes at 180~C.
  5. Set on the wire rack to cool before storing into air-tight container.


  Happy Animal Cookies Baking !!


Thursday, April 15, 2010

Learn2Bake – April Challenge is Back to Basic Butter Cake


Yes, this would our club's first challenge, I'm so glad that we have 8 members RSVP to join in the challenge. Thank you for the support! As the Creator of the club, I definitely will have to participate in the challenge myself. I still remember my very first butter cake, which is also my very first bake. My MiL is my mentor and she told me that if I can bake a butter cake well, then I can almost everything. Wow! That sounded so challenging and without hesitation, I took it all in.....and bake my very first Butter Cake, of course with her supervision.......and (hehe) using her oven and all her utensils, as I haven't had a single equipment at home that relates to 'baking' that is.....:P
It turned out OK ........but not excellent as the bottom part of the cake still has some 'not so properly cook' part. My MiL didn't want to discourage me and told I did a good job, but well, of course I knew it exactly. I didn't give up , and in a week time, I brought my oven and mixer, and decided to give another try, this time everything on my own. The second butter cake was also more or less the same as the first one, and I desperately wanted to know why??? So I search the internet, look through books, and finally found my answers, or I would termed it as "useful tips". So, hey guys, do pick up this tips, it works for me.......it might for you too! Happy Butter Cake Baking ^-^


Tips that I Picked Up
  1. Always pre-heat your oven when you start mixing your ingredients or at least 20-30 minutes. This will gives the oven an even temperature heat-up when it's time to bake.
  2. Always invest in a good brand of butter to get a maximum satisfaction both in taste and aroma of the cake eg: Golden Churn, Anchor....
  3. Have all ingredients in room temperature especially the butter, it must be softened, but not melting.
  4. Egg used must be at least 55gm each weighing with the shell or Grade 'B'.
  5. If possible, try to use the requested baking tin size for that recipe, so that your cake will have enough room to rise and expand, which will unlikely result in a 'volcano erupting' pattern in the centre :P ( unless you are very familiar with the tin size substitution)
  6. Do not open the oven door to check during the first 20-25 minutes of baking. This will result the cake to rise unevenly.
  7. Always beat butter and castor sugar until they the mixture is fluffy and pale in colour
  8. Always add eggs, one at a time, and mix it well with the mixture in every addition.
  9. After adding the flour mixture to the butter mixture, remember do not beat it, but slowly incorporate the dry and wet ingredients together instead.
  10. Again, all ovens varies in the temperature, so do familiarize yourself with your oven, I might bake my butter cake using 45 mins, but you might need 55-60 mins, that's totally OK, as long as the skewer inserted into the centre comes out clean, which mean your cake is cooked.
I didn't use the recipe that I suggested to the club members as I would like to try out this 'Traditional Butter Cake' recipe from my "I Love Butter Cake' by Kevin Chai cookbook. I found the recipe interesting as it calls for an extra 100gm of margarine (after 250gm butter).........gosh, this cake is going to be really 'rich'. I wanted to see the difference and so I did it. On top of that I also added a 40gm of Nestum cereal to it so that the kids will not say......."Oh Mummy, butter cake again?"....hehehe, kids nowadays are hard to please, you have to be creative :P 
The end result was I have an extended baking time of 40 minutes (aside the initial 40 minutes) as the cake was quite a big one, I used a "flower shape 8.5" tin", and it has a thickness of about 10cm (height) , the texture of the cake was really buttery rich both in taste and aroma, very moist and the Nestum on top gives a very crusty topping (but the next day it will be soft already), so I would say, best consume the day it is bake ^-^

Here's the recipe :

TRADITIONAL BUTTER CAKE 
Ingredients 
250gm butter, softened at room temperature
100gm margarine
250gm castor sugar (I used only 200gm because I don't want a too sweet cake) 
¼ tsp salt (If you are using Salted Butter then you can opt this out but I used Unsalted butter) 
5 eggs
½ tsp vanilla essence
250gm plain flour
1 tsp baking powder (if you are using SRF, then you can opt this out too) 
40gm Nestum


Method
  1. Grease and line a 20cm/8" baking tin. (I used a 8.5" flower-shaped tin). Pre-heat the oven to 180~C.
  2. Beat butter, margarine, sugar and salt until light and fluffy.
  3. Add in the eggs, one at a time, beating thoroughly after each addition.
  4. Stir in the essence and fold in the sifted flour, baking powder and mix well until it's well blended.
  5. Spread the batter into the prepared tin.
  6. Sprinkle the Nestum on top of the batter, and bake in oven for 35-40 minutes (but I used an additional of 40 minutes) or until it's cooked.

Monday, April 12, 2010

Steamed Waterchestnut Cake


I bought quite a few cookbooks on Nyonya Delicacies, Local Kuehs and Dim Sum Making......but haven't actually had time to try it out. Most of the time, I'm so hooked up with the western type of baking. Recently, this mood of mine in making local delicacies came, I don't know how and why.....maybe because I'm quite baked-uop with all the western stuffs and it's time to change direction a bit to the local kuehs and yummy dim sums and white paos. I borrowed a cookbook from my MiL the other day and it's titled – "Pasar Malam Delights" by Chan Bee Sim, Philip Yoong and Alan Kok. It's interesting to see that there are a lot of local delights sold in Malaysia's pasar malam (night market). I don't much about KK pasar malam because I seldom go out at night........but when I'm in KL visiting my sisters, I like to follow them to the pasar malam at their housing district, and definitely you can find a lot of yummy good food there.

Flipping through this cookbook, I realised that a lot of the ingredients called for in this book are mainly the green peas flour , glutinous rice flour, coconut milk, tang ming flour, tapioca flour and rice flour. The reason is I think because most of the recipes are 'steamed' method instead of baking in the oven. I found one of the recipe in the book very suitable as these few months KK has been heated up quite badly, and everyone in the house is experiencing sore throat, flu and cough and feeling heatiness all over, its "Steamed Waterchestnut Cake"......and the best thing is you don't eat this cake when it's hot, but eat it cold.......it's very cooling and nice, even the kids don't really fancy kueh, but this one, they thought it was a pudding or agar-agar, and end up finishing it really fast J.......and MiL likes it too ^-^

Here's the recipe and try it out....it's simple and fast too.......Happy Steam Cake baking .
 

Steamed Waterchestnut Cake

Ingredients

450ml thick coconut milk ( I used the fresh coconut milk)

750ml water

100gm waterchestnut starch

25gm tapioca flour

25gm wheat starch / tang ming flour

200gm sugar

A dash of salt

250gm waterchestnuts, peeled and chopped to small pieces


Method
  1. Put all ingredients (except the waterchestnuts) into a saucepan and stir to cook until it has thickened slightly. Be careful as it turned thick quite quickly once it's heated.
  2. Remove from heat, add in chopped waterchestnuts and mix well.
  3. Heat up a steamer separately and get ready to steam the cake.
  4. Pour mixture into a 8" / 20cm round tray and steam at high heat for about 30-35 minutes or until cooked.
  5. Remove and leave to cool. Chill in the fridge for 4 hours before cutting into pieces and serve cold.
Tip # 1: Just in case your water in the steamer is getting lesser and the cake is not cooked yet, add only boiling water into the steamer, not cold water , as this will fluctuate the temperature of the steamer and might affect the steaming of the cake.


Happy baking!

Tuesday, April 6, 2010

Sugar Doughnut Muffins


Don't these awesome muffins catch your attention? Well, it did caught mine.......I was browsing through one of the blogger's update and this 'cute mushroom-head like' muffins just got me looking at it for a while and of course made me promise myelf that I'm going to make it tonight.......yes! tonight, and not any other night. I just couldn't wait to bake it to see if mine will turned out like that too......a little dome or mushroom-head......it's just so cute. Then, the generous coating of the castor sugar just made it even glamorous, LOL ^_^

Hey, if you can't resist seeing this post, faster lah, grab your ingredients and start making it.......in fact, my kids liked it very much, they were giving me a description of "in between a doughnut and a muffin" kind of texture, not like a cake........but a Doughnut Muffin, haha J.........confusing leh........try it and you'll know what they meant. Happy doughnut muffins baking ^_^ 


Sugar Doughnut Muffins (recipe adapted from Baking Bites)


Ingredients (Makes 10 regular size muffins)
- ¾ cup castor sugar
- 1 large egg
- 1 ½ cups all purpose flour
- 2 tsp baking powder
- ¼ tsp salt
- ¼ tsp ground nutmeg (I didn't have this, so did not put)
- ¼ cup vegetable oil
- ¾ cup milk (I use Full cream Milk)
- 1 tsp vanilla extract

For the sugar frosting
- 2 Tbsp butter, melted
- ½ cup castor sugar, for coating the top 


Method 
1. Preheat oven to 175~C / 350~F. Lightly grease a muffin pan with cooking spray or vegetable oil.

2. In a large bowl, beat together sugar and egg until light in colour (A).

3. In a separate bowl, whisk together flour, baking powder, salt and nutmeg (B).

4. Pour the (B) into (A) and stir to combine.

5. Pour in vegetable oil, milk and vanilla extract, one after another.

6. Divide batter evenly into 10 muffin cups, filling each about 2/3 full. 


7. Bake for 15 -20 minutes, or until a tester inserted in the center comes out clean.

8. While muffins are baking, melt butter and pour remaining sugar into a small bowl.

9. When muffins are done, use a pastry brush, lightly brush the top with the melted butter, remove from the pan and roll in sugar. Let cool on a wire rack.


Happy Baking....xoxo!
 

Sunday, April 4, 2010

HAZELNUT COFFEE MERINGUE


Have you ever wonder how to get rid of those 'egg whites' in the freezer after certain recipes you did only requires egg yolks? Hehe.....a useful advice would be to make 'meringue' out of it ^-^ this would be the perfect choice as meringue requires nothing but egg whites. I happened to have 2 egg whites left in the freezer after making a tub of Vanilla Ice-Cream the other day (my first ice-cream attempt, that is). I was thinking to myself I gotta make something with these egg whites before it ended up in the bin soon...... and since Ian has been asking me to make meringue for him for about a week already ........and I kept postponing him due to the fact that I don't want to waste the vice versa (egg yolks).........and I promised him that I'll make some for him as soon as I got leftover egg whites from other baking (having to explain to him that wasting is not a good thing and we should utilise everything if we can ^-^) 
The most recent collection of meringue recipe I got was "Hazelnut Coffee Meringue" which I adapted from DailyDelicious . She has never failed me so far.........and I just love her blogs. A promise is a promise, especially to a child, I never break a promise on my kid as I hate to lose that trust they have in me...........I guess all parents practice that too, right? What is a meringue, for some of you who a e not familiar........it is an airy and light cookies and normally people would use a piping bag to pipe out the meringue into a shape of a 'kisses' or you can always drop a dollop of it by using a tablespoon. Oh yes....for coffee lovers, this is another great recipe for you, you'll definitely like it just as much as Angel, Ian and myself love it , LOL.......Happy Meringue Baking ^^


Hazelnut Coffee Meringue
Ingredients 
2 tsp ...............................Instant coffee granules (I used my Nescafe Gold) 
1 tsp ................................Hot water
3 tsp ................................Coffee flavored liqueur (I used Kahlua) 
114 gm ............................Caster sugar
35 gm ..............................Hazelnut, toasted
60 gm ..............................Egg whites (about 2 egg whites)

Method
  1. Preheat the oven to 350°F . Line a baking sheet with parchment paper or a nonstick liner.
  2. Spread the hazelnut on an unlined baking sheet. Place in the oven and toast until golden brown, 7 to 10 minutes. Let cool completely.
  3. Mix the instant coffee, water and the coffee-flavored liqueur together, set aside.
  4. Pour water to a depth of about 2 inches into a saucepan, place over medium heat, and bring to a simmer.
  5. Combine the egg whites and sugar, in a stainless-steel bowl of a stand mixer that will rest securely in the rim of the saucepan, not touching the water. Whisk together the egg whites and sugar, and then place over the saucepan and continue to whisk until the whites are hot to the touch (120°F using a thermometer), about 5 minutes or so.
  6. Remove the bowl from over the water and place on the mixer stand. Fit the mixer with the whisk attachment and mix high speed until the mixture is very thick and holds glossy, stiff peaks when you lift the beater. Fold in the coffee mixture with a spatula.
  7. Immediately scoop the meringue into a pastry bag fitted with a ½ inch star tip and pipe onto the prepared baking sheet, forming "kisses" about 1½  inches in diameter and spacing them about 1½  inches apart. Or, you can drop the meringue by tablespoonfuls onto the baking sheet. Place the roasted hazelnut on top of each cookie.
  8. Place the baking sheet in the oven and keep the oven door ajar with the handle of a wooden spoon to allow moisture to escape. Bake the cookies until they puff slightly, crack along the sides, and feel dry on the outside but soft to the touch, roughly about 40 – 50 minutes (as individual oven's temperature does varies). Transfer the cookies to a wire rack and let cool. They will keep in an airtight container at room temperature for up to 2 weeks (that is if there are still some left.......haha)
Tip # 1 :  Egg whites will break down in the presence of egg yolk or anything oily, so please make sure that you clean or rinse the bowl and beater with hot water and air-dry thoroughly before starting.


  Happy Meringue Baking !


Thursday, April 1, 2010

LEARN2BAKE CLUB..............A learn to bake club of our own

I'm so glad to announce that I have created a club for interest sharing bakers to get together to bake every month, and share and blog about it in this club of our own. I got this idea from the "Daring Bakers Challenge" that I join and since I know that a lot of my friends out there also shares the same interest and passion for baking......though not professionally, but we are all baking for fun and as a hobby. I'm a new baker myself and yearns to learn every little thing in baking as much as I can, and I think with this club, we can get together every month, propose a challenge, and bake it from A-Z. 
Our very first challenge kick start in the month of April, 1st (April Fools Day, haha) and the theme for the month was suggested by me, as the first challenge.....and it's Back to Basic Butter Cake for a start...hehe
The reason why I pick Butter Cake is because this cake requires the most basic ingredients and whether you are a new baker or an experienced one, Butter Cake can be quite tedious in making too.........so, this would be a good start for all members, a good one for those who just started to bake not so long ago. You will learn to monitor your own oven temperature, on how to thoroughly mix the egg well with the butter and sugar batter in batch and the rest, I'll leave it to you to find out. Anyway, FYI, my very first cake was Butter Cake too ^-^
I always believe that one head is better than one, so if we bake and share our recipes, tips and any thing that we encounter during that baking process, we will learn and grow from there.......unless of course some people are very selfish to share their baking tips and recipes to others.........then that's a different story. I hope those of you who read this blog of mine, and are interested to join, please click on the link above and join us! We are not talking about showing offs, or comparing whose better here in this club........it's mainly a club of our very own, where we can talk about our baking ........nothing but baking........and topics as basic as ingredients to utensils, measuring to mixing, whisking to piping, molding to cutting, temperature to baking......anything basically!! Isn't that great? We don't have any experts here in the club.....or even if we do...we are all equal in this club......OK!! So welcome to "Learn2Bake" where you bake with no pressure........we try, we test and lastly we taste whatever we bake........;)

Let's Learn & Bake 2gether!